UITableView 的編輯模式
在稍前表格 UITableView 章節已經介紹過基本的使用方式,其實 UITableView 提供的功能非常多,這小節會介紹另一個也是常使用到的編輯模式。
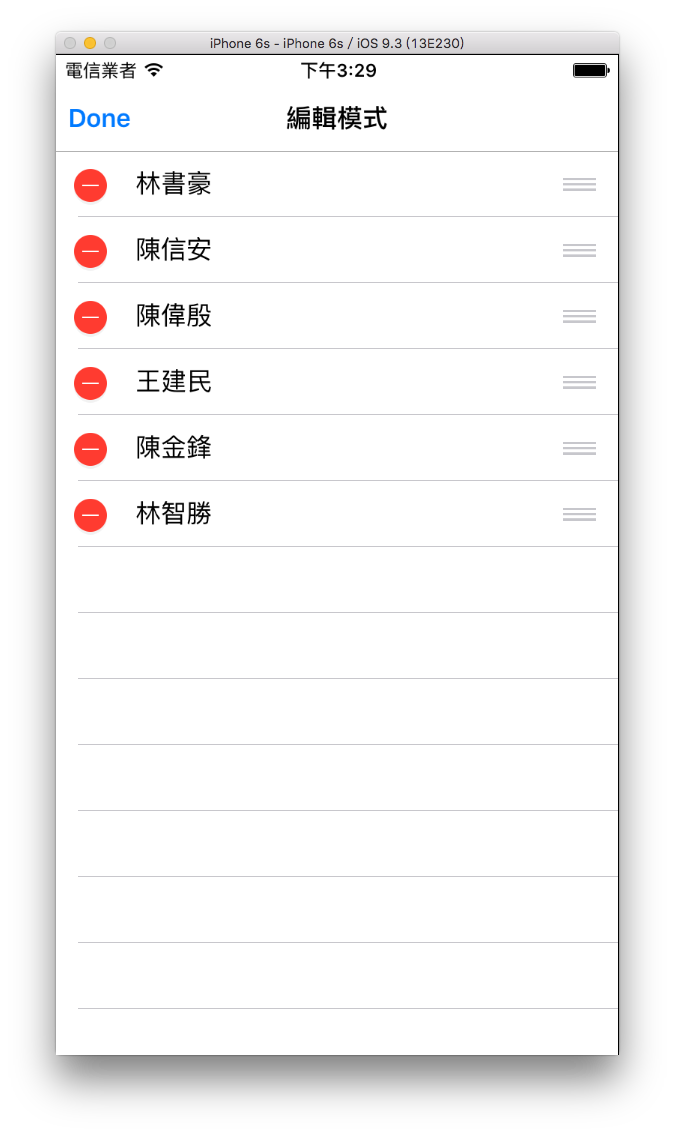
以下是本小節目標:
首先在 Xcode 裡,新建一個 Single View Application 類型的專案,取名為 ExEditUITableView 。
並為ViewController建立兩個屬性以供後續使用:
class ViewController: UIViewController {
    var myTableView :UITableView!
    var info =
      ["林書豪","陳信安","陳偉殷","王建民","陳金鋒","林智勝"]

    // 省略
}
為了方便設置切換 UITableView 編輯模式的按鈕,這邊先在 AppDelegate.swift 設置 導覽控制器 UINavigationController,後續便可在導覽列左右設置按鈕。
首先在 viewDidLoad() 中設置基本設定、 UITableView 及導覽列按鈕:
// 基本設定
let fullsize = UIScreen.main.bounds.size
self.view.backgroundColor = UIColor.white
self.title = "編輯模式"
self.navigationController!.navigationBar.isTranslucent = false


// 建立 UITableView
myTableView = UITableView(frame: CGRect(
  x: 0, y: 0,
  width: fullsize.width,
  height: fullsize.height - 64),
  style: .plain)
myTableView.register(
    UITableViewCell.self, forCellReuseIdentifier: "Cell")
myTableView.delegate = self
myTableView.dataSource = self
myTableView.allowsSelection = true
self.view.addSubview(myTableView)


// 導覽列左邊及右邊按鈕 編輯 & 新增
myTableView.setEditing(true, animated: false)
self.editBtnAction()
上述將導覽列按鈕另外設置在一個方法editBtnAction()中,以供切換編輯模式時可以一併變動。
切換編輯模式
按下編輯按鈕來切換編輯模式,如下:
// 按下編輯按鈕時執行動作的方法
@objc func editBtnAction() {
    myTableView.setEditing(
        !myTableView.isEditing, animated: true)
    if (!myTableView.isEditing) {
        // 顯示編輯按鈕
        self.navigationItem.leftBarButtonItem =
            UIBarButtonItem(
                barButtonSystemItem: .edit,
                target: self,
                action: #selector(ViewController.editBtnAction))

        // 顯示新增按鈕
        self.navigationItem.rightBarButtonItem =
            UIBarButtonItem(
                barButtonSystemItem: .add,
                target: self,
                action: #selector(ViewController.addBtnAction))
    } else {
        // 顯示編輯完成按鈕
        self.navigationItem.leftBarButtonItem =
            UIBarButtonItem(
                barButtonSystemItem: .done,
                target: self,
                action: #selector(ViewController.editBtnAction))

        // 隱藏新增按鈕
        self.navigationItem.rightBarButtonItem = nil
    }
}
上述程式根據 UITableView 的屬性isEditing來判斷目前是否處於編輯模式,並使用方法setEditing(_:animated:)來切換。切換的同時也一併設置新的左右兩邊的按鈕,只有非編輯模式時才有新增的按鈕。
要設置每筆 row 是否可以進入編輯模式,必須實作以下這個委任方法:
// 各 cell 是否可以進入編輯狀態 及 左滑刪除
func tableView(
    _ tableView: UITableView,
    canEditRowAt indexPath: IndexPath) -> Bool {
    return true
}
上述程式是設置為所有 cell 都可以編輯,你也可以根據 indexPath 來讓特定的 section 的 row 不能編輯。
新增一筆資料
在非編輯模式時,可以按導覽列右邊按鈕新增一筆資料,如下:
// 按下新增按鈕時執行動作的方法
@objc func addBtnAction() {
    print("新增一筆資料")
    info.insert("new row", at: 0)

    // 新增 cell 在第一筆 row
    myTableView.beginUpdates()
    myTableView.insertRows(
        at: [IndexPath(row: 0, section: 0)], with: .fade)
    myTableView.endUpdates()
}
上述程式先為示範的陣列新增一筆資料,再在 UITableView 的兩個方法beginUpdates()與endUpdates()中間使用方法insertRows(at:with:)新增一筆資料到 UITableView 視圖中。
排序切換位置
必須實作下面這個委任方法,才會出現排序功能:
// 編輯狀態時 拖曳切換 cell 位置後執行動作的方法
// (必須實作這個方法才會出現排序功能)
func tableView(
    _ tableView: UITableView,
    moveRowAt sourceIndexPath: IndexPath,
    to destinationIndexPath: IndexPath) {
    print("\(sourceIndexPath.row) to \(destinationIndexPath.row)")

    var tempArr:[String] = []

    if(sourceIndexPath.row > destinationIndexPath.row) {
        // 排在後的往前移動
        for (index, value) in info.enumerated() {
            if index < destinationIndexPath.row
                || index > sourceIndexPath.row {
                tempArr.append(value)
            } else if index == destinationIndexPath.row {
                tempArr.append(info[sourceIndexPath.row])
            } else if index <= sourceIndexPath.row {
                tempArr.append(info[index - 1])
            }
        }
    } else if (sourceIndexPath.row < destinationIndexPath.row) {
        // 排在前的往後移動
        for (index, value) in info.enumerated() {
            if index < sourceIndexPath.row
                || index > destinationIndexPath.row {
                tempArr.append(value)
            } else if index < destinationIndexPath.row {
                tempArr.append(info[index + 1])
            } else if index == destinationIndexPath.row {
                tempArr.append(info[sourceIndexPath.row])
            }
        }
    } else {
        tempArr = info
    }

    info = tempArr
    print(info)

}
上述程式除了重新排序 UITableView 之外,也必須將示範的陣列重新排序。
刪除資料
編輯模式下刪除或是左滑刪除時,會執行以下方法:
// 編輯狀態時 按下刪除 cell 後執行動作的方法
// (另外必須實作這個方法才會出現左滑刪除功能)
func tableView(
    _ tableView: UITableView,
    commit editingStyle: UITableViewCell.EditingStyle,
    forRowAt indexPath: IndexPath) {
    let name = info[indexPath.row]

    if editingStyle == .delete {
        info.remove(at: indexPath.row)

        tableView.beginUpdates()
        tableView.deleteRows(at: [indexPath], with: .fade)
        tableView.endUpdates()

        print("刪除的是 \(name)")
    }

}
除了刪除 UITableView 的資料外,也必須刪除示範陣列所屬的值。
以上即為本小節的示範內容。
範例
本小節範例程式碼放在 apps/todo