選擇器 UIPickerView
UIPickerView 跟前一節介紹的 UIDatePicker 有點類似,但彈性更大,當你需要有一個或多個選擇項目時,可以設定自定義的選項及數目。
本節會介紹兩個範例,第一個會介紹如何使用 UIPickerView ,接著則會介紹 UIPickerView 與 UIDatePicker 如何跟 UITextField 結合在一起應用。
建立 UIPickerView
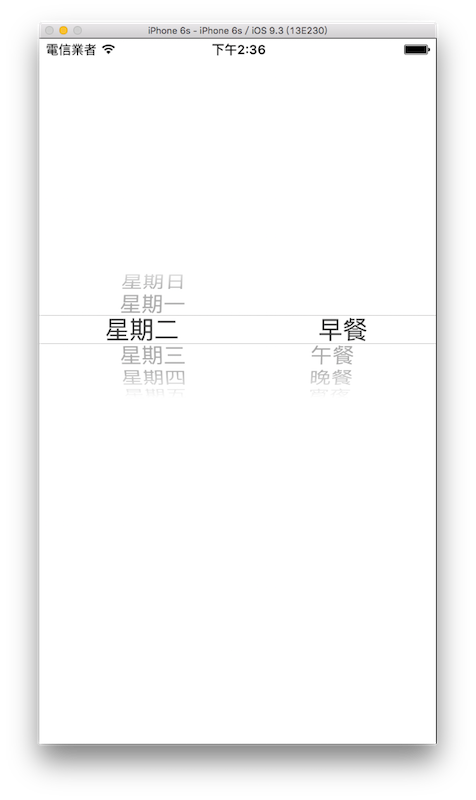
這個範例會建立一個含有兩個選項的 UIPickerView ,可以分別選擇自己的選項,選完後可以再執行自定義的動作,目標如下:
首先在 Xcode 裡,新建一個 Single View Application 類型的專案,取名為 ExUIPickerView 。
一開始先以新增檔案的方式加入一個繼承自 UIViewController 的檔案,命名為 MyViewController ,這要用來實作 UIPickerView 委任模式的方法。
先看到ViewController,我們在viewDidLoad()裡建立一個UIPickerView,設定好它的位置、尺寸及委任對象,並加入到畫面中:
// 建立 UIPickerView 設置位置及尺寸
let myPickerView = UIPickerView(frame: CGRect(
  x: 0, y: fullScreenSize.height * 0.3,
  width: fullScreenSize.width, height: 150))

// 新增另一個 UIViewController
// 用來實作委任模式的方法
let myViewController = MyViewController()

// 必須將這個 UIViewController 加入
self.addChild(myViewController)

// 設定 UIPickerView 的 delegate 及 dataSource
myPickerView.delegate = myViewController
myPickerView.dataSource = myViewController

// 加入到畫面
self.view.addSubview(myPickerView)
上述程式可以看到,利用稍前新建的 MyViewController.swift 檔案來做為 UIPickerView 的委任對象,在前面章節 以 UITextField 為例的委任模式 中,是將委任對象設置為self,也就是本身所在的ViewController,而這邊則是使用另一個方式,將委任對象設置為另一個檔案,交由它來實作。
兩個方式都可以,端看你如何設計,像如果需要設置委任對象的元件太多時,你就可以分別為元件各自建立所屬的檔案來實作委任模式的方法,未來如果有需要這個獨立檔案也可以很快速的拿過去使用。
委任模式
接著我們看到新建的MyViewController,首先為它加上委任模式需要的協定 UIPickerViewDelegate 與 UIPickerViewDataSource ,如下:
class MyViewController: UIViewController,
  UIPickerViewDelegate, UIPickerViewDataSource {
  // 省略
}
加上協定後你會看到出現如下圖的錯誤,因為這個委任模式有設置必須實作的方法:

所以你必須實作它設置為必須實作的方法,這邊必須實作的方法有兩個,如下:
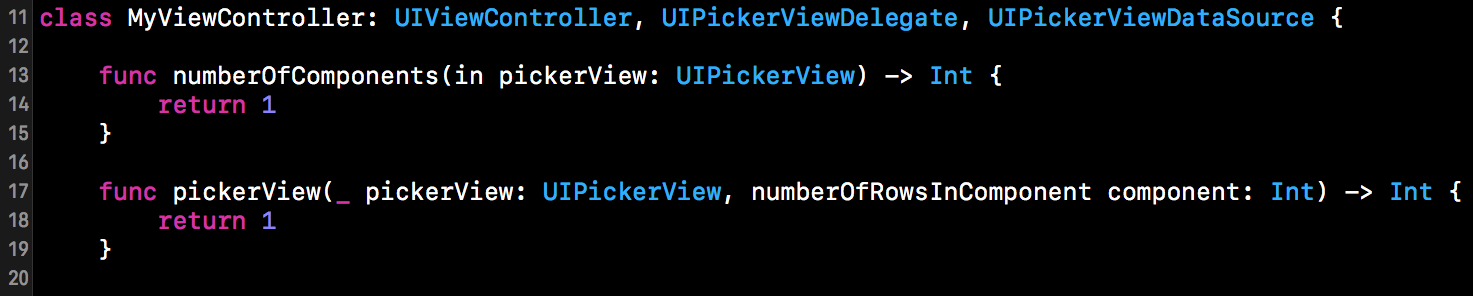
上圖中返回的數字1是暫時的,稍後會完成這兩個方法的內容。
再來先為MyViewController加上四個屬性,稍後會使用於示範中:
class MyViewController: UIViewController,
  UIPickerViewDelegate, UIPickerViewDataSource {

    let week = [
      "星期日","星期一","星期二","星期三",
      "星期四","星期五","星期六"]
    let meals = ["早餐","午餐","晚餐","宵夜"]
    var whatDay = "星期日"
    var whatMeal = "早餐"

    // 省略
}
接著在MyViewController內實作其餘需要的委任的方法,以完善 UIPickerView 的內容,如下:
// UIPickerViewDataSource 必須實作的方法:
// UIPickerView 有幾列可以選擇
func numberOfComponents(
    in pickerView: UIPickerView) -> Int {
    return 2
}

// UIPickerViewDataSource 必須實作的方法:
// UIPickerView 各列有多少行資料
func pickerView(_ pickerView: UIPickerView,
    numberOfRowsInComponent component: Int) -> Int {
    // 設置第一列時
    if component == 0 {
        // 返回陣列 week 的成員數量
        return week.count
    }

    // 否則就是設置第二列
    // 返回陣列 meals 的成員數量
    return meals.count
}

// UIPickerView 每個選項顯示的資料
func pickerView(_ pickerView: UIPickerView,
    titleForRow row: Int, forComponent component: Int)
    -> String? {
    // 設置第一列時
    if component == 0 {
        // 設置為陣列 week 的第 row 項資料
        return week[row]
    }

    // 否則就是設置第二列
    // 設置為陣列 meals 的第 row 項資料
    return meals[row]
}

// UIPickerView 改變選擇後執行的動作
func pickerView(_ pickerView: UIPickerView,
    didSelectRow row: Int, inComponent component: Int) {
    // 改變第一列時
    if component == 0 {
        // whatDay 設置為陣列 week 的第 row 項資料
        whatDay = week[row]
    } else {
        // 否則就是改變第二列
        // whatMeal 設置為陣列 meals 的第 row 項資料
        whatMeal = meals[row]
    }

    // 將改變的結果印出來
    print("選擇的是 \(whatDay) , \(whatMeal)")
}
上述程式的方法中,可以看到出現的參數component及row,分別代表著哪一列以及這列的哪一行資料,例如第二列的第三行資料,就是component為1以及row為2。
請注意,這兩個參數component及row都是從0開始算起,剛好與陣列從0開始算起相同,所以可以很方便的使用week[row]這種方式來找到需要的資料。
以上建立 UIPickerView 並實作好它需要的委任方法,即完成這個範例的程式內容。
與 UITextField 的綜合應用
以實務經驗來說, UIPickerView 大多會與 UITextField 結合應用,將選擇器嵌入在輸入框原先鍵盤的視圖位置,這樣就只會在需要的時候才顯示整個選擇器的畫面。
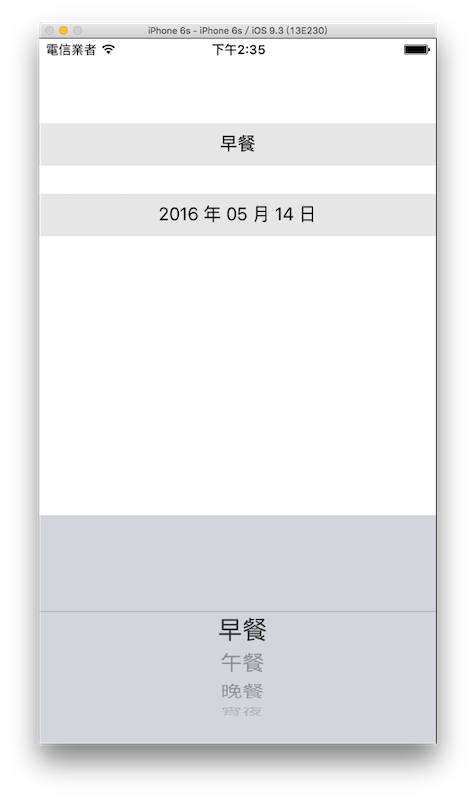
這個範例會放入兩個輸入框 UITextField ,並分別使用 UIPickerView 及 UIDatePicker 來當做輸入框的輸入工具,以下是目標:
首先在 Xcode 裡,新建一個 Single View Application 類型的專案,取名為 ExPickerInUITextField 。
先為ViewController建立兩個屬性:
class ViewController: UIViewController {
    let meals = ["早餐","午餐","晚餐","宵夜"]
    var formatter: DateFormatter! = nil

    // 省略
}
UIPickerView 與 UITextField
一開始先在ViewController內建立一個與 UIPickerView 結合應用的 UITextField ,如下:
// 建立一個 UITextField
var myTextField = UITextField(frame: CGRect(
  x: 0, y: 0,
  width: fullScreenSize.width, height: 40))

// 建立 UIPickerView
let myPickerView = UIPickerView()

// 設定 UIPickerView 的 delegate 及 dataSource
myPickerView.delegate = self
myPickerView.dataSource = self

// 將 UITextField 原先鍵盤的視圖更換成 UIPickerView
myTextField.inputView = myPickerView

// 設置 UITextField 預設的內容
myTextField.text = meals[0]

// 設置 UITextField 的 tag 以利後續使用
myTextField.tag = 100

// 設置 UITextField 其他資訊並放入畫面中
myTextField.backgroundColor = UIColor(
  red: 0.9, green: 0.9, blue: 0.9, alpha: 1)
myTextField.textAlignment = .center
myTextField.center = CGPoint(
  x: fullScreenSize.width * 0.5,
  y: fullScreenSize.height * 0.15)
self.view.addSubview(myTextField)
上述程式可以看到 UITextField 的屬性inputView,預設為一個鍵盤的視圖,而將它設置為 UIPickerView ,便可以將該鍵盤取代。
另外還有一個屬性tag,所有 UIKIT 元件都有tag這個屬性,你可以為它設置一個整數數字,在之後要使用時,可以用父視圖的方法viewWithTag()來取得。像是上述的 UITextField 元件的tag設為100且加入到self.view,那稍後要取回這個 UITextField 時,就是使用self.view?.viewWithTag(100) as? UITextField。
接著如同前面一個範例檔案一樣,要設置委任對象,這次是將委任對象設為self,所以以下為ViewController加上需要的協定:
class ViewController: UIViewController,
  UIPickerViewDelegate, UIPickerViewDataSource {
  // 省略
}
再為ViewController加上委任需要的方法:
// UIPickerViewDataSource 必須實作的方法:
// UIPickerView 有幾列可以選擇
func numberOfComponents(
    in pickerView: UIPickerView) -> Int {
    return 1
}

// UIPickerViewDataSource 必須實作的方法:
// UIPickerView 各列有多少行資料
func pickerView(_ pickerView: UIPickerView,
    numberOfRowsInComponent component: Int) -> Int {
    // 返回陣列 meals 的成員數量
    return meals.count
}

// UIPickerView 每個選項顯示的資料
func pickerView(_ pickerView: UIPickerView,
  titleForRow row: Int,
  forComponent component: Int) -> String? {
    // 設置為陣列 meals 的第 row 項資料
    return meals[row]
}

// UIPickerView 改變選擇後執行的動作
func pickerView(_ pickerView: UIPickerView,
  didSelectRow row: Int, inComponent component: Int) {
    // 依據元件的 tag 取得 UITextField
    let myTextField =
      self.view?.viewWithTag(100) as? UITextField

    // 將 UITextField 的值更新為陣列 meals 的第 row 項資料
    myTextField?.text = meals[row]
}
Hint
as?的用法請參考向下型別轉換。
UIDatePicker 與 UITextField
再來在ViewController內建立一個與 UIDatePicker 結合應用的 UITextField ,如下:
// 建立另一個 UITextField
myTextField = UITextField(frame: CGRect(
  x: 0, y: 0,
  width: fullScreenSize.width, height: 40))

// 初始化 formatter 並設置日期顯示的格式
formatter = DateFormatter()
formatter.dateFormat = "yyyy 年 MM 月 dd 日"

// 建立一個 UIDatePicker
let myDatePicker = UIDatePicker()

// 設置 UIDatePicker 格式
myDatePicker.datePickerMode = .date

// 設置 UIDatePicker 顯示的語言環境
myDatePicker.locale = Locale(identifier: "zh_TW")

// 設置 UIDatePicker 預設日期為現在日期
myDatePicker.date = Date()

// 設置 UIDatePicker 改變日期時會執行動作的方法
myDatePicker.addTarget(
  self,
  action: #selector(ViewController.datePickerChanged),
  for: .valueChanged)

// 將 UITextField 原先鍵盤的視圖更換成 UIDatePicker
myTextField.inputView = myDatePicker

// 設置 UITextField 預設的內容
myTextField.text =
  formatter.string(from: myDatePicker.date)

// 設置 UITextField 的 tag 以利後續使用
myTextField.tag = 200

// 設置 UITextField 其他資訊並放入畫面中
myTextField.backgroundColor = UIColor(
  red: 0.9, green: 0.9, blue: 0.9, alpha: 1)
myTextField.textAlignment = .center
myTextField.center = CGPoint(
  x: fullScreenSize.width * 0.5,
  y: fullScreenSize.height * 0.25)
self.view.addSubview(myTextField)
接著為ViewController加上變換日期後執行動作的方法:
// UIDatePicker 改變選擇時執行的動作
@objc func datePickerChanged(datePicker:UIDatePicker) {
    // 依據元件的 tag 取得 UITextField
    let myTextField =
      self.view?.viewWithTag(200) as? UITextField

    // 將 UITextField 的值更新為新的日期
    myTextField?.text =
      formatter.string(from: datePicker.date)
}
隱藏編輯狀態
最後為了選擇完後可以隱藏 UIPickerView (或 UIDatePicker ),加上點擊空白處可以隱藏編輯狀態的功能,先在ViewController中加上觸控事件:
// 增加一個觸控事件
let tap = UITapGestureRecognizer(
  target: self,
  action:
    #selector(ViewController.hideKeyboard(tapG:)))

tap.cancelsTouchesInView = false

// 加在最基底的 self.view 上
self.view.addGestureRecognizer(tap)
再為ViewController加上觸控事件的方法:
// 按空白處會隱藏編輯狀態
@objc func hideKeyboard(tapG:UITapGestureRecognizer){
    self.view.endEditing(true)
}
以上便為這個範例的程式說明。
範例
本節範例程式碼放在 uikit/uipickerview