手勢 UIGestureRecognizer
UIKit 提供了六種不同的手勢可供監聽,分別為 Tap 輕點、Long Press 長按、Swipe 滑動、Pan 拖曳、Pinch 縮放及Rotation 旋轉,你可以為元件加上這些手勢的監聽,並執行觸發時的動作。
其實在前面介紹的輸入多行文字 UITextView就已經有使用過了,當時是加上輕點手勢來關閉鍵盤,這節會完整的介紹支援的手勢。
這節會有兩個範例程式,第一個會以單純的 UIView 示範 Tap 輕點、Long Press 長按、Swipe 滑動及 Pan 拖曳,第二個則是搭配圖片示範 Pinch 縮放及 Rotation 旋轉。
搭配 UIView 示範
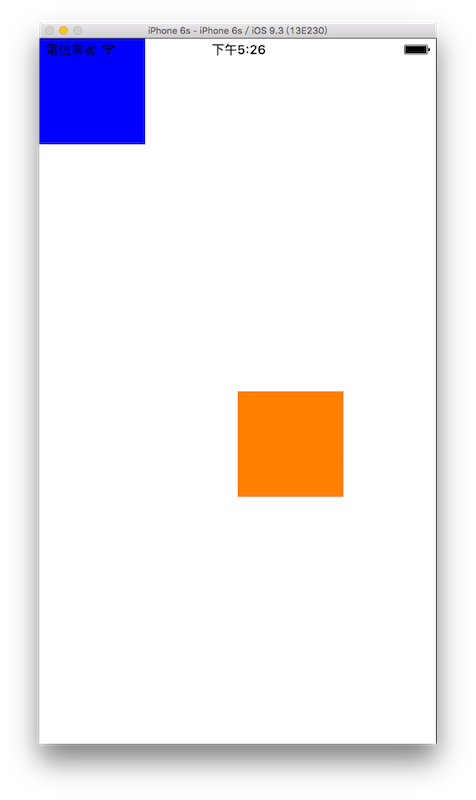
這個範例的目標如下,輕點( Tap )、長按( Long Press )與滑動( Swipe )是加在基底視圖self.view上,輕點與長按會印出文字,而滑動時會控制藍色方塊上下左右移動。拖曳( Pan )則是加在橘色方塊上,可以將這個方塊拖曳到要移動的位置:
首先在 Xcode 裡,新建一個 Single View Application 類型的專案,取名為 ExUIGestureRecognizer 。
一開始先為ViewController建立兩個屬性:
class ViewController: UIViewController {
    var myUIView :UIView!
    var anotherUIView :UIView!

    // 省略
}
Tap 輕點
Tap 輕點手勢可以支援單指與多指,請在實機上測試或是模擬機上按住option鍵,會出現兩個灰色圈圈,即可模擬兩指操作。以下先在viewDidLoad()加入程式,示範單指與兩指的手勢:
// 雙指輕點 (雙指以上手勢只能用實機測試)
let doubleFingers =
  UITapGestureRecognizer(
    target:self,
    action:#selector(ViewController.doubleTap(_:)))

// 點幾下才觸發 設置 1 時 則是點一下會觸發 依此類推
doubleFingers.numberOfTapsRequired = 1

// 幾根指頭觸發
doubleFingers.numberOfTouchesRequired = 2

// 為視圖加入監聽手勢
self.view.addGestureRecognizer(doubleFingers)


// 單指輕點
let singleFinger = UITapGestureRecognizer(
  target:self,
  action:#selector(ViewController.singleTap(_:)))

// 點幾下才觸發 設置 2 時 則是要點兩下才會觸發 依此類推
singleFinger.numberOfTapsRequired = 2

// 幾根指頭觸發
singleFinger.numberOfTouchesRequired = 1

// 雙指輕點沒有觸發時 才會檢測此手勢 以免手勢被蓋過
singleFinger.require(toFail: doubleFingers)

// 為視圖加入監聽手勢
self.view.addGestureRecognizer(singleFinger)
接著則是在ViewController加上觸發手勢後執行動作的方法:
// 觸發單指輕點兩下手勢後 執行的動作
@objc func singleTap(_ recognizer:UITapGestureRecognizer){
    print("單指連點兩下時觸發")

    // 取得每指的位置
    self.findFingersPositon(recognizer)
}

// 觸發雙指輕點一下手勢後 執行的動作
@objc func doubleTap(_ recognizer:UITapGestureRecognizer){
    print("雙指點一下時觸發")

    // 取得每指的位置
    self.findFingersPositon(recognizer)
}

@objc func findFingersPositon(_ recognizer:UITapGestureRecognizer) {
    // 取得每指的位置
    let number = recognizer.numberOfTouches
    for i in 0..<number {
        let point = recognizer.location(ofTouch: i, in: recognizer.view)
        print("第 \(i + 1) 指的位置:\(NSCoder.string(for: point))")
    }
}
上述程式可以看到,還可以獲得每指輕點時的位置(是一個 CGPoint )。
Long Press 長按
以下先在viewDidLoad()加入程式:
// 長按
let longPress = UILongPressGestureRecognizer(
  target: self,
  action: #selector(ViewController.longPress(_:)))

// 為視圖加入監聽手勢
self.view.addGestureRecognizer(longPress)
接著則是在ViewController加上觸發手勢後執行動作的方法:
// 觸發長按手勢後 執行的動作
@objc func longPress(_ recognizer:UILongPressGestureRecognizer) {
    if recognizer.state == .began {
        print("長按開始")
    } else if recognizer.state == .ended {
        print("長按結束")
    }

}
Swipe 滑動
以下先在viewDidLoad()加入程式,因為每個方向滑動都算獨立的手勢,所以這邊會加上四個滑動手勢,分別為是上、左、下、右:
// 一個可供移動的 UIView
myUIView = UIView(frame: CGRect(
  x: 0, y: 0, width: 100, height: 100))
myUIView.backgroundColor = UIColor.blue
self.view.addSubview(myUIView)

// 向上滑動
let swipeUp = UISwipeGestureRecognizer(
  target:self,
  action:#selector(ViewController.swipe(_:)))
swipeUp.direction = .up

// 幾根指頭觸發 預設為 1
swipeUp.numberOfTouchesRequired = 1

// 為視圖加入監聽手勢
self.view.addGestureRecognizer(swipeUp)


// 向左滑動
let swipeLeft = UISwipeGestureRecognizer(
  target:self,
  action:#selector(ViewController.swipe(_:)))
swipeLeft.direction = .left

// 為視圖加入監聽手勢
self.view.addGestureRecognizer(swipeLeft)


// 向下滑動
let swipeDown = UISwipeGestureRecognizer(
  target:self,
  action:#selector(ViewController.swipe(_:)))
swipeDown.direction = .down

// 為視圖加入監聽手勢
self.view.addGestureRecognizer(swipeDown)


// 向右滑動
let swipeRight = UISwipeGestureRecognizer(
  target:self,
  action:#selector(ViewController.swipe(_:)))
swipeRight.direction = .right

// 為視圖加入監聽手勢
self.view.addGestureRecognizer(swipeRight)
接著則是在ViewController加上觸發手勢後執行動作的方法:
// 觸發滑動手勢後 執行的動作
@objc func swipe(_ recognizer:UISwipeGestureRecognizer) {
    let point = myUIView.center

    if recognizer.direction == .up {
        print("Go Up")
        if point.y >= 150 {
            myUIView.center = CGPoint(
              x: myUIView.center.x,
              y: myUIView.center.y - 100)
        } else {
            myUIView.center = CGPoint(
              x: myUIView.center.x, y: 50)
        }
    } else if recognizer.direction == .left {
        print("Go Left")
        if point.x >= 150 {
            myUIView.center = CGPoint(
              x: myUIView.center.x - 100,
              y: myUIView.center.y)
        } else {
            myUIView.center = CGPoint(
              x: 50, y: myUIView.center.y)
        }
    } else if recognizer.direction == .down {
        print("Go Down")
        if point.y <= fullSize.height - 150 {
            myUIView.center = CGPoint(
              x: myUIView.center.x,
              y: myUIView.center.y + 100)
        } else {
            myUIView.center = CGPoint(
              x: myUIView.center.x,
              y: fullSize.height - 50)
        }
    } else if recognizer.direction == .right {
        print("Go Right")
        if point.x <= fullSize.width - 150 {
            myUIView.center = CGPoint(
              x: myUIView.center.x + 100,
              y: myUIView.center.y)
        } else {
            myUIView.center = CGPoint(
              x: fullSize.width - 50,
              y: myUIView.center.y)
        }
    }
}
上述程式將觸發四個方向滑動的手勢寫在同一個方法裡,並用屬性direction來辨別是哪一個方向。這邊會判斷是否會超出畫面,如果超出時就會改成移動到邊界,而不會真的超出去。
請記得手勢是加在self.view上,所以整個畫面上都可以滑動,而不是只點擊藍色方塊滑動。
Pan 拖曳
以下先在viewDidLoad()加入程式:
// 一個可供移動的 UIView
anotherUIView = UIView(frame: CGRect(
  x: fullSize.width * 0.5, y: fullSize.height * 0.5,
  width: 100, height: 100))
anotherUIView.backgroundColor = UIColor.orange
self.view.addSubview(anotherUIView)

// 拖曳手勢
let pan = UIPanGestureRecognizer(
  target:self,
  action:#selector(ViewController.pan(_:)))

// 最少可以用幾指拖曳
pan.minimumNumberOfTouches = 1

// 最多可以用幾指拖曳
pan.maximumNumberOfTouches = 1

// 為這個可移動的 UIView 加上監聽手勢
anotherUIView.addGestureRecognizer(pan)
接著則是在ViewController加上觸發手勢後執行動作的方法:
// 觸發拖曳手勢後 執行的動作
@objc func pan(_ recognizer:UIPanGestureRecognizer) {
    // 設置 UIView 新的位置
    let point = recognizer.locationInView(self.view)
    anotherUIView.center = point
}
手勢是加在橘色方塊上,所以只能拖曳橘色方塊來移動。
手勢的傳遞
上面四個手勢都加上去後,你可能會不經意發現,在藍色方塊上雙指輕點或是單指輕點兩下,仍然會觸發到輕點的手勢,這是因為監聽手勢會傳遞。
當一個元件接收到手勢動作時,如果這個元件本身沒有可以執行的動作,那它會將手勢傳遞到它的父視圖,如果還是沒有,就會一直往上傳遞,以這邊來說,就是藍色方塊myUIView將手勢動作傳遞給父視圖self.view,所以仍然會觸發到輕點手勢。
以上就是這個範例的內容。
搭配圖片示範
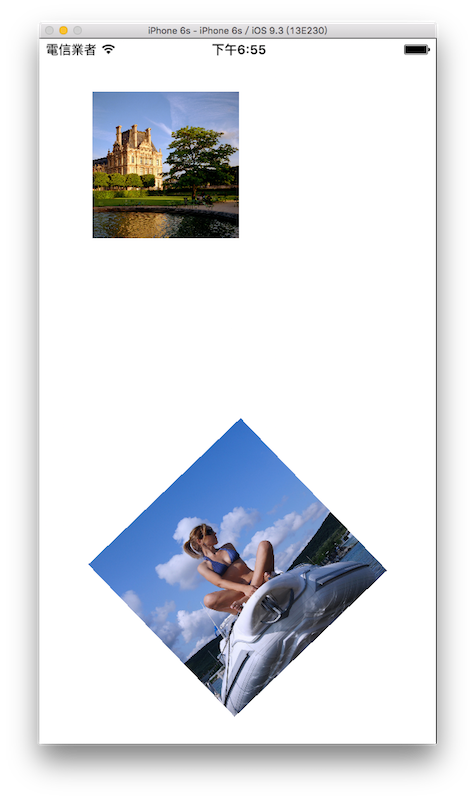
接著進行第二個範例程式,這個範例的目標如下,一張圖片可以縮放,另一張圖片可以旋轉:
首先在 Xcode 裡,新建一個 Single View Application 類型的專案,取名為 ExImageUIGestureRecognizer 。
一開始先以加入檔案的方式加入兩張用來縮放與旋轉的圖片。接著為ViewController建立兩個屬性:
class ViewController: UIViewController {
    var myImageView :UIImageView!
    var anotherImageView :UIImageView!

    // 省略
}
這個範例用到的縮放及旋轉手勢,都需要兩指操作,請在實機上測試或是模擬機上按住option鍵,會出現兩個灰色圈圈,即可模擬兩指操作。
Pinch 縮放
以下先在viewDidLoad()加入程式:
// 建立一個用來縮放的圖片
myImageView = UIImageView(image: UIImage(named: "01.jpg"))
myImageView.frame = CGRect(
  x: 50, y: 50, width: 200, height: 200)
self.view.addSubview(myImageView)

let pinch = UIPinchGestureRecognizer(
  target:self,
  action:#selector(ViewController.pinch(_:)))

self.view.addGestureRecognizer(pinch)
接著則是在ViewController加上觸發手勢後執行動作的方法:
// 觸發縮放手勢後 執行的動作
@objc func pinch(_ recognizer:UIPinchGestureRecognizer) {
    if recognizer.state == .began {
        print("開始縮放")
    } else if recognizer.state == .changed {
        // 圖片原尺寸
        let frm = myImageView.frame

        // 縮放比例
        let scale = recognizer.scale

        // 目前圖片寬度
        let w = frm.width

        // 目前圖片高度
        let h = frm.height

        // 縮放比例的限制為 0.5 ~ 2 倍
        if w * scale > 100 && w * scale < 400 {
            myImageView.frame = CGRect(
              x: frm.origin.x, y: frm.origin.y,
              width: w * scale, height: h * scale)
        }
    } else if recognizer.state == .ended {
        print("結束縮放")
    }

}
Rotation 旋轉
以下先在viewDidLoad()加入程式:
// 建立一個用來旋轉的圖片
anotherImageView = UIImageView(
  image: UIImage(named: "02.jpg"))
anotherImageView.frame = CGRect(
  x: 0, y: 0, width: 200, height: 200)
anotherImageView.center = CGPoint(
  x: fullSize.width * 0.5, y: fullSize.height * 0.75)
self.view.addSubview(anotherImageView)

let rotation = UIRotationGestureRecognizer(
  target: self,
  action: #selector(ViewController.rotation(_:)))

self.view.addGestureRecognizer(rotation)
接著則是在ViewController加上觸發手勢後執行動作的方法:
// 觸發旋轉手勢後 執行的動作
@objc func rotation(_ recognizer:UIRotationGestureRecognizer) {
    // 弧度
    let radian = recognizer.rotation

    // 旋轉的弧度轉換為角度
    let angle = radian * (180 / CGFloat(Double.pi))

    anotherImageView.transform =
        CGAffineTransform(rotationAngle: radian)

    print("旋轉角度: \(angle)")
}
以上就是這個範例的內容。
圖片來源
- https://www.flickr.com/photos/boklm/11908643634/
- https://www.flickr.com/photos/53812099@N04/11844277903/
範例
本節範例程式碼放在 uikit/uigesturerecognizer