網格 UICollectionView
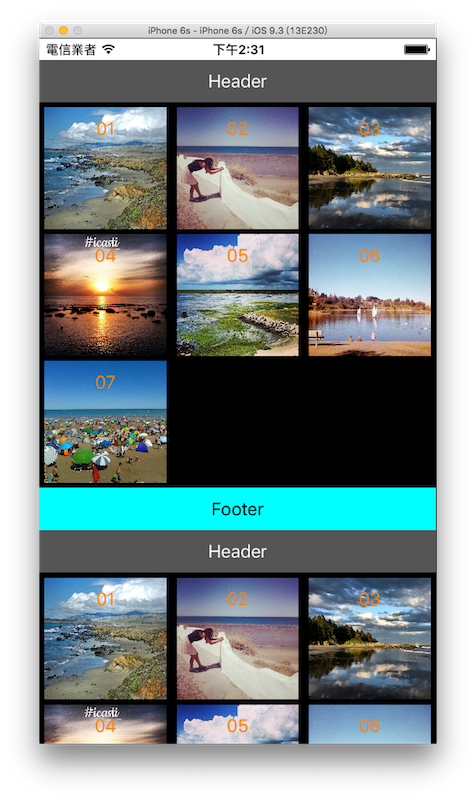
UICollectionView 可以用來表現網格這樣多行多列元件的樣式, iPhone 內建的 照片 App 就是用 UICollectionView 為主要呈現方式。
本節的目標如下,分成兩組照片依序往下排列,每組有七張照片,一行有三張照片,點擊照片可以有自定義執行的動作:
首先在 Xcode 裡,新建一個 Single View Application 類型的專案,取名為 ExUICollectionView 。
一開始先以加入檔案的方式加入七張示範用的圖片。並在viewDidLoad()設置底色,如下:
// 設置底色
self.view.backgroundColor = UIColor.whiteColor()
UICollectionView 有些地方與 UITableView 類似,它的每個儲存格也稱為 cell ,委任對象實作的方法也差不多。而 UICollectionView 有更多需要設置的地方,所以本節範例步驟較多,這邊先簡單講解一下:
- 一開始需要先設置
UICollectionViewFlowLayout,這是用來讓你自己定義要如何呈現網格的樣式(像是每個 cell 的大小,彼此的間隔寬度等等),再交給初始化 UICollectionView 元件時使用。 - 接著建立 UICollectionView 元件,除了要註冊 cell 之外,如果要自定義每個 section 的 header 或 footer 時,也必須註冊 header 或 footer ,以供後續重複使用。(註冊 cell 原因請參考前節說明)
- UICollectionView 的 cell 需要自定義一個繼承自 UICollectionViewCell 的類別,用來加上需要的元件,這邊會加上一張圖片( UIImageView )及一行字( UILabel )。
- 最後要實作委任對象需要的方法。
建立 UICollectionViewFlowLayout
UICollectionView 大部分的建立步驟與 UITableView 相同,UICollectionViewFlowLayout 則是需要事先額外建立的部份,用來自定義呈現的樣式,首先在viewDidLoad()裡建立 UICollectionViewFlowLayout :
// 建立 UICollectionViewFlowLayout
let layout = UICollectionViewFlowLayout()

// 設置 section 的間距 四個數值分別代表 上、左、下、右 的間距
layout.sectionInset = UIEdgeInsets.init(
  top: 5, left: 5, bottom: 5, right: 5);

// 設置每一行的間距
layout.minimumLineSpacing = 5

// 設置每個 cell 的尺寸
layout.itemSize = CGSize(
    width: CGFloat(fullScreenSize.width)/3 - 10.0,
    height: CGFloat(fullScreenSize.width)/3 - 10.0)

// 設置 header 及 footer 的尺寸
layout.headerReferenceSize = CGSize(
    width: fullScreenSize.width, height: 40)
layout.footerReferenceSize = CGSize(
    width: fullScreenSize.width, height: 40)
建立 UICollectionView
緊接著在viewDidLoad()裡建立 UICollectionView ,這邊會使用到前面建立的 UICollectionViewFlowLayout (常數layout):
// 建立 UICollectionView
let myCollectionView = UICollectionView(frame: CGRect(
    x: 0, y: 20,
    width: fullScreenSize.width, height: fullScreenSize.height - 20),
    collectionViewLayout: layout)

// 註冊 cell 以供後續重複使用
myCollectionView.register(
    MyCollectionViewCell.self,
    forCellWithReuseIdentifier: "Cell")

// 註冊 section 的 header 跟 footer 以供後續重複使用
myCollectionView.register(
  UICollectionReusableView.self,
  forSupplementaryViewOfKind:
    UICollectionView.elementKindSectionHeader,
  withReuseIdentifier: "Header")
myCollectionView.register(
  UICollectionReusableView.self,
  forSupplementaryViewOfKind:
    UICollectionView.elementKindSectionFooter,
  withReuseIdentifier: "Footer")

// 設置委任對象
myCollectionView.delegate = self
myCollectionView.dataSource = self

// 加入畫面中
self.view.addSubview(myCollectionView)
section 的 header 與 footer 都是屬於 UICollectionReusableView 類別,所以註冊時就是使用這個類別註冊。
自定義的 UICollectionViewCell 類別
前面註冊 cell 時用到的就是自定義的 UICollectionViewCell 類別 MyCollectionViewCell,這邊會介紹如何建立。
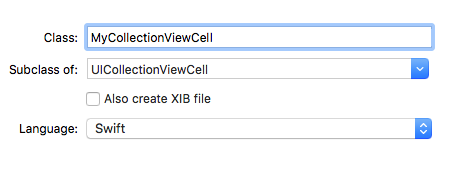
先以新增檔案的方式增加一個新的檔案,其中要注意的是,因為是要建立繼承自 UICollectionViewCell 的類別,所以進行到下圖這個步驟時,Subclass of:要填寫UICollectionViewCell,並將檔案名稱設為MyCollectionViewCell:
建立完成後,接著進到MyCollectionViewCell.swift這隻檔案中,加入需要顯示的元件,一張圖片( UIImageView )及一行字( UILabel ):
class MyCollectionViewCell: UICollectionViewCell {
    var imageView:UIImageView!
    var titleLabel:UILabel!

    override init(frame: CGRect) {
        super.init(frame: frame)

        // 取得螢幕寬度
        let w = Double(
          UIScreen.main.bounds.size.width)

        // 建立一個 UIImageView
        imageView = UIImageView(frame: CGRect(
          x: 0, y: 0,
          width: w/3 - 10.0, height: w/3 - 10.0))
        self.addSubview(imageView)

        // 建立一個 UILabel
        titleLabel = UILabel(frame:CGRect(
          x: 0, y: 0, width: w/3 - 10.0, height: 40))
        titleLabel.textAlignment = .center
        titleLabel.textColor = UIColor.orange
        self.addSubview(titleLabel)
    }

    required init?(coder aDecoder: NSCoder) {
        fatalError("init(coder:) has not been implemented")
    }

}
委任模式
接著再回到ViewController,先加上委任需要的協定:
class ViewController: UIViewController,
  UICollectionViewDelegate,
  UICollectionViewDataSource {
  // 省略
}
以及必須實作的方法:
// 必須實作的方法:每一組有幾個 cell
func collectionView(
    _ collectionView: UICollectionView,
    numberOfItemsInSection section: Int) -> Int {
    return 7
}

// 必須實作的方法:每個 cell 要顯示的內容
func collectionView(
    _ collectionView: UICollectionView,
    cellForItemAt indexPath: IndexPath) -> UICollectionViewCell {
    // 依據前面註冊設置的識別名稱 "Cell" 取得目前使用的 cell
    let cell = collectionView.dequeueReusableCell(
        withReuseIdentifier: "Cell",
        for: indexPath)
        as! MyCollectionViewCell

    // 設置 cell 內容 (即自定義元件裡 增加的圖片與文字元件)
    cell.imageView.image =
        UIImage(named: "0\(indexPath.item + 1).jpg")
    cell.titleLabel.text = "0\(indexPath.item + 1)"

    return cell
}
最後則是其餘委任對象需要的方法,以完善整個 UICollectionView 元件:
// 有幾個 section
func numberOfSections(
    in collectionView: UICollectionView) -> Int {
    return 2
}

// 點選 cell 後執行的動作
func collectionView(
    _ collectionView: UICollectionView,
    didSelectItemAt indexPath: IndexPath) {
    print("你選擇了第 \(indexPath.section + 1) 組的")
    print("第 \(indexPath.item + 1) 張圖片")
}

// 設置 reuse 的 section 的 header 或 footer
func collectionView(
    _ collectionView: UICollectionView,
    viewForSupplementaryElementOfKind kind: String,
    at indexPath: IndexPath) -> UICollectionReusableView {
    // 建立 UICollectionReusableView
    var reusableView = UICollectionReusableView()

    // 顯示文字
    let label = UILabel(frame: CGRect(
        x: 0, y: 0, width: fullScreenSize.width, height: 40))
    label.textAlignment = .center

    // header
    if kind == UICollectionView.elementKindSectionHeader {
    // 依據前面註冊設置的識別名稱 "Header" 取得目前使用的 header
      reusableView =
        collectionView.dequeueReusableSupplementaryView(
          ofKind: UICollectionView.elementKindSectionHeader,
          withReuseIdentifier: "Header",
          for: indexPath)
        // 設置 header 的內容
        reusableView.backgroundColor = UIColor.darkGray
        label.text = "Header";
        label.textColor = UIColor.white

    } else if kind == UICollectionView.elementKindSectionFooter {
    // 依據前面註冊設置的識別名稱 "Footer" 取得目前使用的 footer
      reusableView =
        collectionView.dequeueReusableSupplementaryView(
          ofKind: UICollectionView.elementKindSectionFooter,
          withReuseIdentifier: "Footer",
          for: indexPath)
        // 設置 footer 的內容
        reusableView.backgroundColor = UIColor.cyan
        label.text = "Footer";
        label.textColor = UIColor.black

    }

    reusableView.addSubview(label)
    return reusableView
}
上述程式中需要注意的是最後一個方法,用來顯示每個 section 的 header 與 footer (如果你前面有設置的話),因為 header 與 footer 是共用一個方法,且都是屬於UICollectionReusableView元件,所以需要先建立一個UICollectionReusableView元件,並使用kind參數來分辨這時是要設置 header 或 footer 。
接著就與 cell 類似,依據註冊時使用的識別名稱,取得重複使用的元件,再設置其內的內容,這邊範例是單純的加上一個 UILabel 。
以上即為本節範例的內容。
圖片來源
- https://www.flickr.com/photos/sloalan/15367448967/
- https://www.flickr.com/photos/14076637@N04/15097401627/
- https://www.flickr.com/photos/126692641@N04/16389075922/
- https://www.flickr.com/photos/134525588@N04/20333376532/
- https://www.flickr.com/photos/jane_nospecial/15076368915/
- https://www.flickr.com/photos/sdasmarchives/8871276526/
- https://www.flickr.com/photos/14076637@N04/16178682209/
範例
本節範例程式碼放在 uikit/uicollectionview