規劃與實作
請先在 Xcode 打開這個專案( apps/taipeitravel/TaipeiTravel )以供後續與文章內容比對檢視,本小節說明僅會提示部分內容,不會將所有程式碼都寫出來,請以專案程式碼為主。
首先介紹遊玩臺北應用程式可以操作的動作,先看下圖流程:
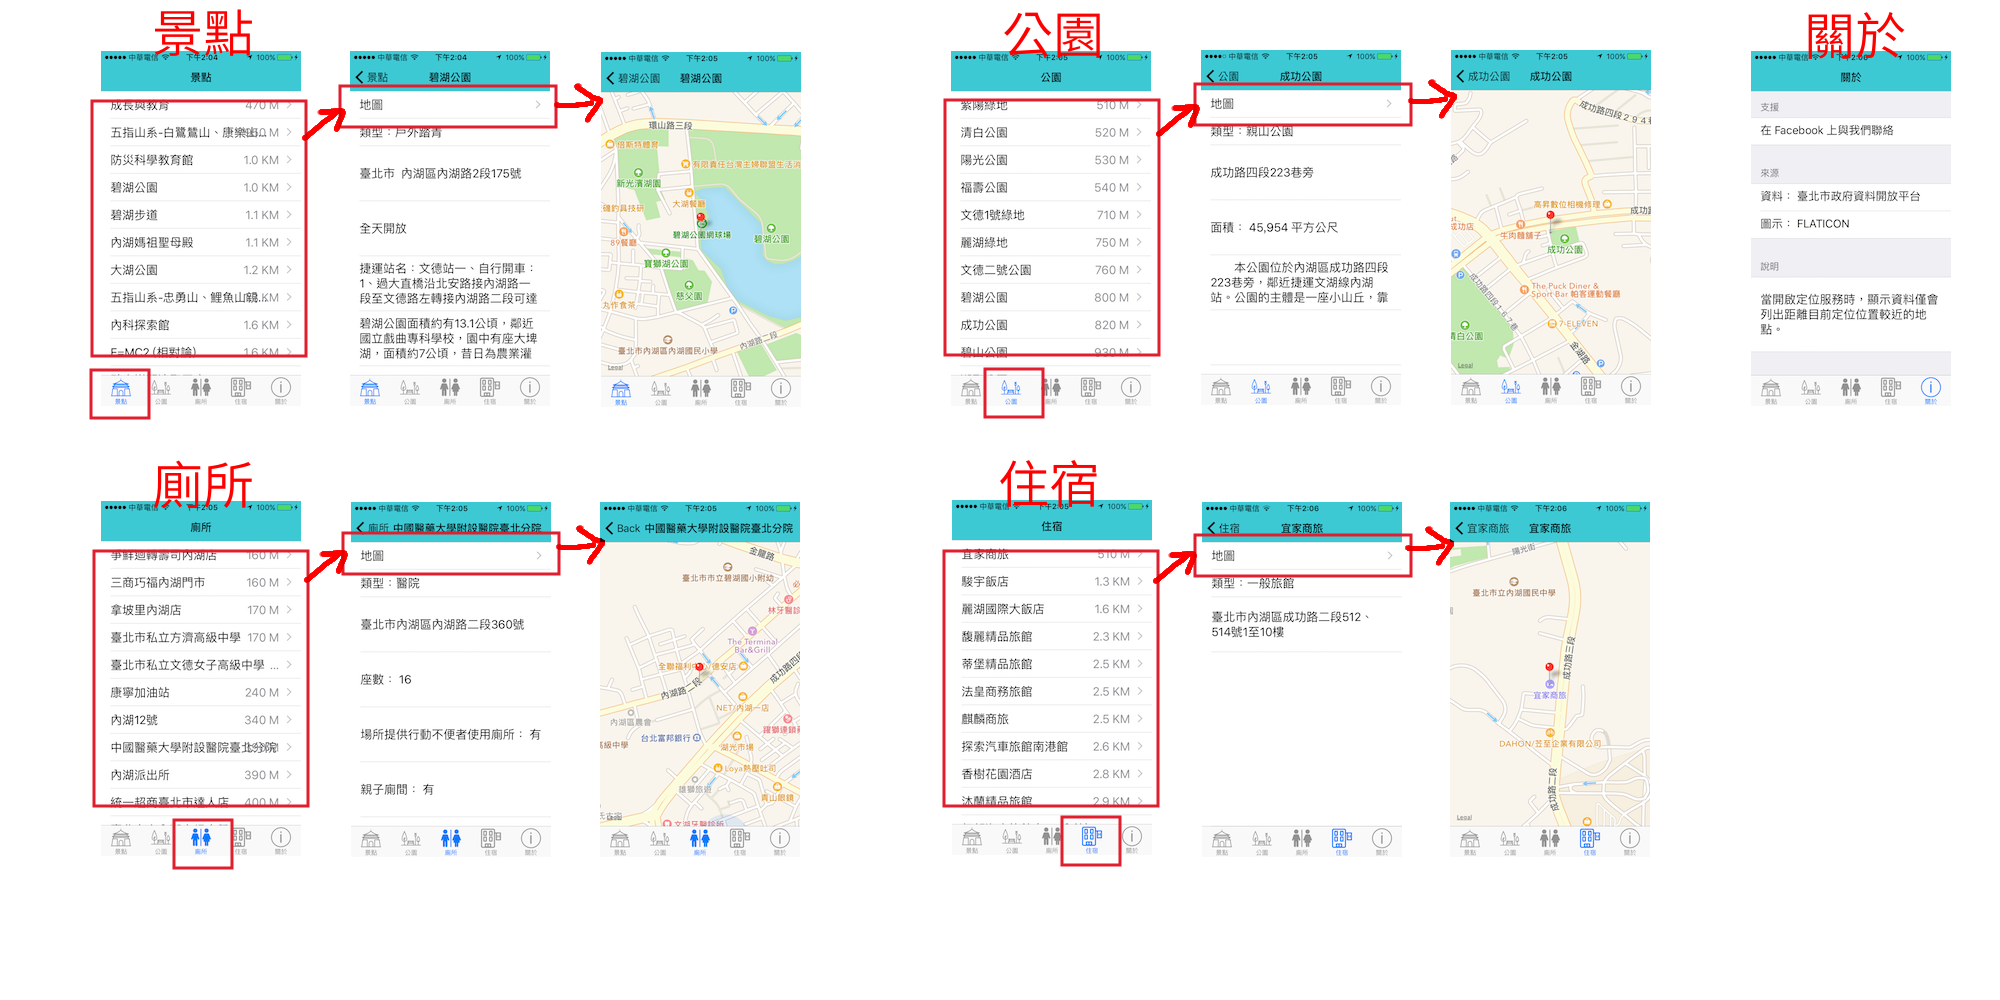
上圖由 UITabBarController 的第一個 Tab 景點為應用程式預設起始頁,列表中會顯示與目前定位位置的距離(如果有授權定位功能),點擊項目後進入這個景點的詳細頁,會列出相關的資訊,當 API 有提供這個地點的位置時,則可以點擊第一列地圖以進入地圖頁。
其餘三個公園、廁所及住宿的運作方式與景點相同。
第五個 Tab 關於頁則是可以前往支援網頁與來源網頁,並提供簡單說明。
前置作業
首先在 Xcode 裡,新建一個 Single View Application 類型的專案,取名為 TaipeiTravel 。
一開始先依照程式之外的設定的步驟設定好。以及將需要的 Swift 檔案、圖示檔案都先加入至專案中:
- BaseMainViewController.swift
- DetailViewController.swift
- MapViewController.swift
- HotelMainViewController.swift
- HotelDetailViewController.swift
- LandmarkMainViewController.swift
- LandmarkDetailViewController.swift
- ParkMainViewController.swift
- ParkDetailViewController.swift
- ToiletMainViewController.swift
- ToiletDetailViewController.swift
- InfoMainViewController.swift
- icons 目錄中的五個圖示檔案
AppDelegate.swift
在進入應用程式的畫面前,需要在 AppDelegate.swift 中先做些設定:
- 向使用者要求定位功能權限。(請參考地圖與定位內容。)
- 設置導覽列的預設樣式。
- 依照標籤列控制器 UITabBarController 的說明,將根視圖設為一個 UITabBarController ,接著再設置每個 Tab 的根視圖控制器為 UINavigationController ,最後依序為每個 Tab 設置 LandmarkMainViewController, ParkMainViewController, ToiletMainViewController, HotelMainViewController 為首頁。
此專案結合 標籤列控制器 UITabBarController 與 導覽控制器 UINavigationController ,所以必須先設置 UITabBarController 再設置 UINavigationController ,以達到有標籤列也有導覽列的功能。
景點首頁
因為前四個 Tab 內容差不多,這邊以景點頁面作範例,其餘三個則是類似的方式進行。
Coordinate.swift
在進入到首頁之前,先新增一個用來依照距離遠近排序景點的檔案。先以新增檔案的方式加入這個檔案,檔案類型要選擇iOS > Source > Swift File。
因為會使用到定位功能,所以記得先引入定位函式庫:
import CoreLocation
接著新增一個名為 Coordinate 的結構( Struct ),有三個屬性,依序為景點的索引值、緯度及經度,如下:
struct Coordinate {
    var index: Int
    var latitude: Double
    var longitude: Double
}
然後為這個結構 Coordinate 擴展 Comparable 協定( Comparable 是一個 Swift 內建的協定,常見型別如 Int, Double 都有實作),讓型別為 Coordinate 的變數可以互相比較:
extension Coordinate: Comparable {}
當擴展 Comparable 協定時,必須實作下列兩個方法(==為比較兩者是否相等,<則是比較前者是否小於後者),才可以讓變數彼此比較:
func ==(a: Coordinate, b: Coordinate) -> Bool {
    let myUserDefaults = UserDefaults.standard

    // 是否取得定位權限
    let locationAuth = myUserDefaults.object(
        forKey: "locationAuth") as? Bool

    if locationAuth != nil && locationAuth! {
        // 取得目前使用者座標
        let userLatitude = myUserDefaults.object(
            forKey: "userLatitude") as? Double
        let userLongitude = myUserDefaults.object(
            forKey: "userLongitude") as? Double
        let userLocation = CLLocation(
            latitude: userLatitude!,
            longitude: userLongitude!)

        // 兩點的座標
        let aLocation = CLLocation(
            latitude: a.latitude, longitude: a.longitude)
        let bLocation = CLLocation(
            latitude: b.latitude, longitude: b.longitude)

        return aLocation.distance(from: userLocation) == bLocation.distance(from: userLocation)
    } else {
        return a.index == b.index
    }

}

func <(a: Coordinate, b: Coordinate) -> Bool {
    let myUserDefaults = UserDefaults.standard

    // 是否取得定位權限
    let locationAuth = myUserDefaults.object(
        forKey: "locationAuth") as? Bool

    if locationAuth != nil && locationAuth! {
        // 取得目前使用者座標
        let userLatitude = myUserDefaults.object(
            forKey: "userLatitude") as? Double
        let userLongitude = myUserDefaults.object(
            forKey: "userLongitude") as? Double
        let userLocation = CLLocation(
            latitude: userLatitude!,
            longitude: userLongitude!)

        // 兩點的座標
        let aLocation = CLLocation(
            latitude: a.latitude, longitude: a.longitude)
        let bLocation = CLLocation(
            latitude: b.latitude, longitude: b.longitude)

        return aLocation.distance(from: userLocation) < bLocation.distance(from: userLocation)
    } else {
        return a.index < b.index
    }
}
上述兩個實作的方法中,會先取得 iPhone 目前所在的定位位置,再與兩個型別為 Coordinate 的變數分別以distance(from:)方法取得距離,再以這個距離判斷哪一個景點較近,後續會再以索引值取得景點的其餘資訊。
BaseMainViewController.swift
這邊將重複的動作寫在繼承自 UIViewController 的 BaseMainViewController 中,再讓四個首頁繼承自他。
先注意以下 BaseViewController 的幾個屬性:
- 建立屬性
refreshDays,限制向遠端 API 要求資料的次數,超過這個天數才會再次取得新的資訊。 - 建立屬性
apiDataAll存放取得的所有景點資訊。 - 建立屬性
apiData存放依距離較近排序的有限景點資訊,以簡化顯示內容。 - 建立屬性
apiDataForDistance存放景點的經緯度資訊,以供依距離遠近排序的功能。
viewWillAppear()
在viewWillAppear(_:)方法中,先確認是否取得定位權限,再依據是否有定位位置來排序景點資料。(當無定位權限時,會依照 API 提供的排序列出所有資料,有定位權限時,則是只列出較近距離的景點。)
viewDidDisappear()
離開這個頁面時,要記得停止定位自身位置。
其他方法
addData()方法是用來區分是否要取得遠端 API 資料,這邊會限制一個天數,如果超過這個天數才會重新取得資料,否則就是直接將已經存在的 JSON 檔案拿出來使用。
如果需要向遠端 API 取得資料,則是使用normalGet()方法來取得(請參考取得遠端 API 資料並儲存),在委任方法中會執行下載完成後的動作,因為會以一個閉包( closure )執行,所以必須使用DispatchQueue.main.async(execute:)來以主執行緒更新 UITableView ,如下:
// 下載完成
func urlSession(
    _ session: URLSession,
    downloadTask: URLSessionDownloadTask,
    didFinishDownloadingTo location: URL) {
    do {
        let data = try? Data(contentsOf: location)
        try data?.write(to: self.targetUrl, options: .atomic)
        print("普通獲取遠端資訊的方式:儲存資訊成功")

        // 更新獲取資料的日期
        self.myUserDefaults.set(
            self.todayDateInt,
            forKey: self.fetchType + "FetchDate")
        self.myUserDefaults.synchronize()

        DispatchQueue.main.async(execute: {
            self.addTable(self.targetUrl)
        })

    } catch {
        print("普通獲取遠端資訊的方式:儲存資訊失敗")
    }

}
在addTable()方法中,會先以jsonParse()方法解析取得的 JSON 檔案,並將資料存在屬性apiDataAll。
接著在refreshAPIData()方法中,以reloadAPIData()方法來將屬性apiDataAll的內容依據限制再轉存至屬性apiData及設置另外的屬性apiDataForDistance(有定位權限時,依距離遠近排序有限數目。無權限時則是全部內容。)。
其中屬性apiDataForDistance是一個型別為[Coordinate]!的陣列,這個陣列會在fillIntoAPIDataForDistanceAndSort(_:)方法中使用apiDataForDistance.sort(by: <)方法依照距離排序內部成員(請參考稍前介紹的 Coordinate.swift 內容),以供後續顯示在 UITableView 中。
UITableView 的委任方法
tableView(_ tableView: UITableView, cellForRowAt indexPath: IndexPath) -> UITableViewCell方法是用來顯示每筆事項的內容,一開始會先以apiDataForDistance[indexPath.row].index取得已經依距離遠近排序的索引值,再以這個索引值到景點資料陣列apiData中取得目前要顯示的景點資料,如下:
let thisData =
  apiData[apiDataForDistance[indexPath.row].index]
取得景點資料之後,再作顯示名稱、距離多遠的後續處理。
LandmarkMainViewController.swift
繼承自 BaseMainViewController 的 LandmarkMainViewController 只需要再將前往細節頁的部份加上就差不多了。
在goDetail()方法中,會先取得目前所點擊的景點資訊,便可以前往細節頁。
景點 細節頁
細節頁也是如同首頁,將重複的動作寫在一隻檔案中,再各自繼承自他。
DetailViewController.swift
先注意以下 DetailViewController 的屬性:
- 建立屬性
hasMap,來區分目前這筆景點資訊有沒有經緯度資訊,有的話才可以進入地圖頁。
UITableView 的委任方法
tableView(_ tableView: UITableView, didSelectRowAt indexPath: IndexPath)方法負責點擊項目時的動作。這部份加上一個點擊時可展開顯示全部文字內容的功能。
LandmarkDetailViewController.swift
繼承自 DetailViewController 的 LandmarkDetailViewController 將要顯示的資料設置好即可。
地圖頁
這頁會使用到地圖功能,所以要先引入地圖函式庫(請參考地圖與定位內容。):
import MapKit
在viewDidLoad()中取得景點資訊,並在地圖上顯示景點的位置,以及使用者自己的位置(如果有取得定位授權的話)。
公園、廁所與住宿頁面與上述內容類似,便不再重複介紹。
關於頁
這頁使用 UITableView 的 .grouped 特性各別列出不同的功能:
- 前往外部 Facebook 網頁。
- 前往外部 資料與圖示資源 網頁。
- 應用程式說明。
前往外部網頁時,使用下列方式:
let requestUrl = URL(string:
    "https://www.facebook.com/swiftgogogo")
UIApplication.shared.open(requestUrl!)
範例
此應用程式範例程式碼放在 apps/taipeitravel/TaipeiTravel
你也可以在 App Store 中找到這個應用程式,名稱為遊玩臺北 ![]() 。
。