Core Data
Core Data 是一個設計用來儲存資料的框架,背後操作的雖然仍是 SQLite ,但其簡化了資料庫的處理,讓你不用了解 SQL 語法也可以快速的為應用程式建立並使用資料庫。
如果你是第一次接觸資料庫相關的知識,以下會簡單的介紹一下運作方式:
資料庫顧名思義,是一個用來儲存大量資料的容器,以現實生活來說,最簡單的資料庫可以用一個文件夾來比喻。
例如,一個文件夾是用來存放所有學生的資訊,裡頭每一頁都代表一名學生的資訊,每一名學生都會有各式各樣的資訊,像是姓名、座號、血型或出生年月日等等。
以上例子了解後,我們將它與 Core Data 的內容對比在一起,如下:
| 現實生活 | 文件夾 | 每一頁學生 | 學生的各個資訊 |
|---|---|---|---|
| Core Data | Entity (實體) | 每筆資料 | Attribute (屬性) |
所以假設當我們要為 Core Data 新增一筆資料時,這個步驟為:
- 首先找出要操作的 Entity (拿出文件夾)。
- 接著將要新增的一筆資料的各個 attribute 設定好(拿出一張新的紙,將一位新學生的基本資料填上)。
- 在 Entity 增加這筆資料(為文件夾加入新的一頁,也就是新增這位學生的資訊)。
- 儲存這個增加資料的動作(文件整理完畢,將文件夾關上)。
Hint
- 如果以關聯式資料庫的概念來對比的話, Core Data 的 Entity 與 Attribute 大約可以比對到 Table (資料表)與 Field (欄位)。
- 本節僅會介紹基本的功能,實際的資料庫操作可能會更為複雜。
以下會先介紹在應用程式中如何加入 Core Data ,接著會介紹如何新增、讀取、更新與刪除資料,最後會將 Core Data 功能獨立寫在一個類別中,來把實際操作 Core Data 的程式碼封裝起來。
加入 Core Data
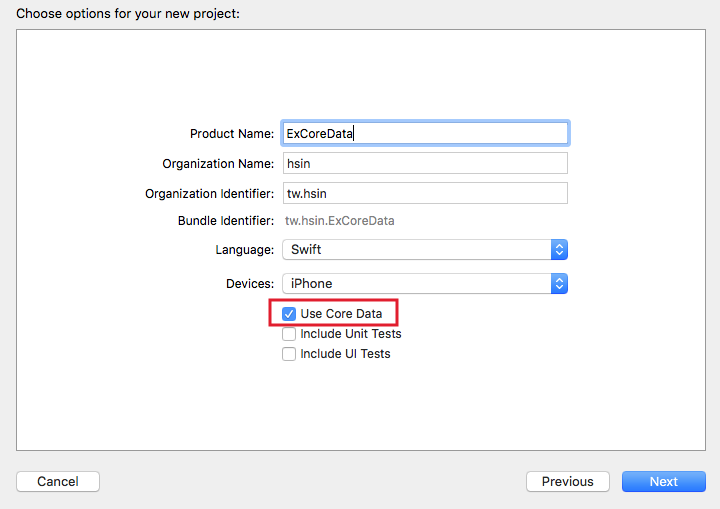
首先在 Xcode 裡,新建一個 Single View Application 類型的專案,取名為 ExCoreData 。建立專案的過程中,請記得將Use Core Data打勾,如下圖:
設定 Entity 與 Attribute
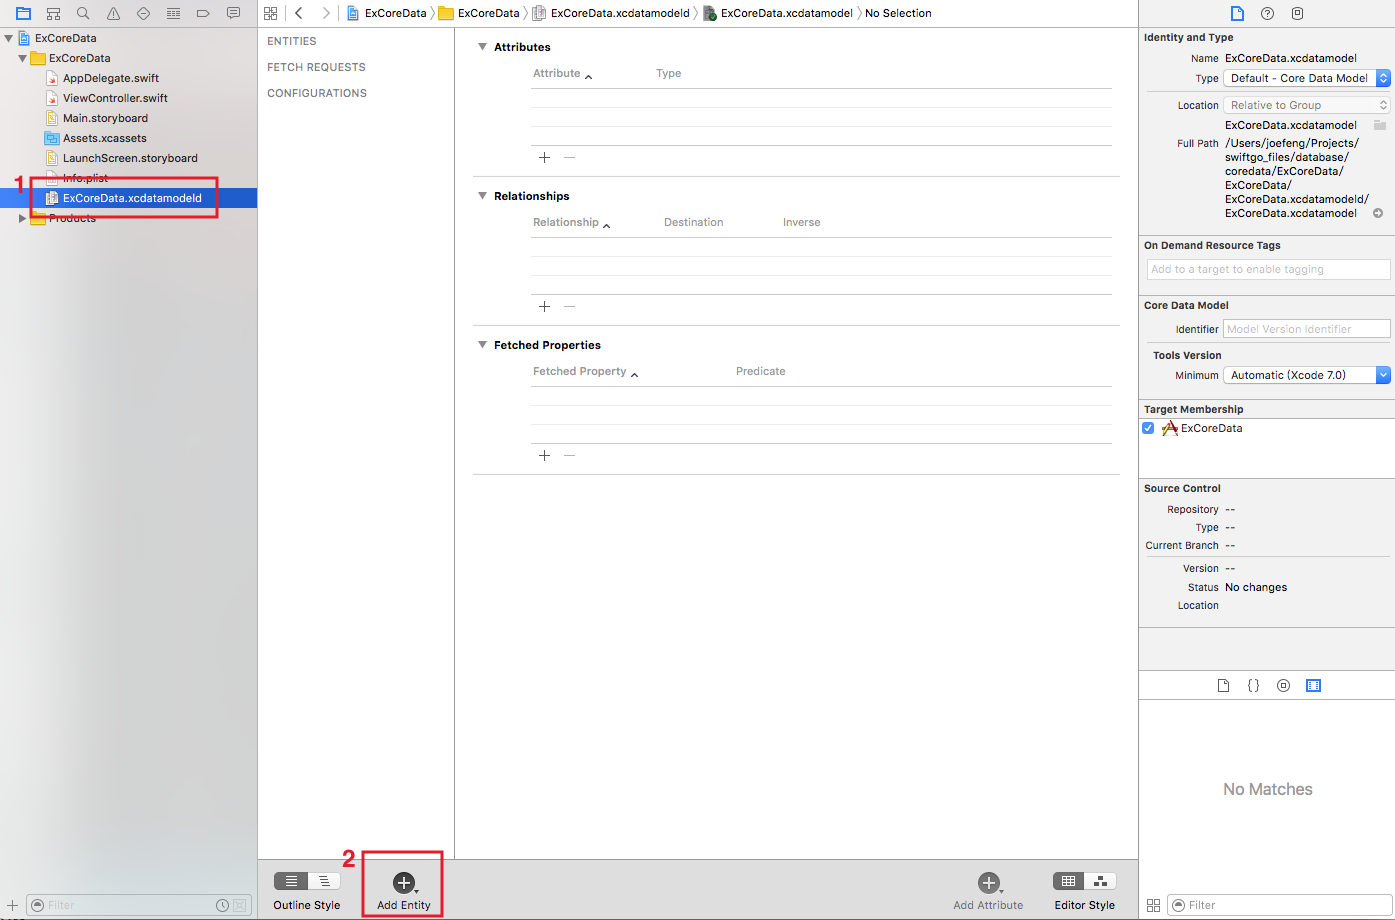
建立好專案後,可以看到左邊的專案檔案列表中,有一個名為ExCoreData.xcdatamodeld的檔案,這是用來設定 Entity 與 Attribute 的檔案。請點開這隻檔案並點擊下方的Add Entity按鈕,如下圖:
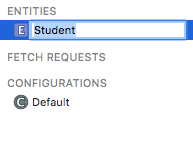
接著將這個 Entity 命名為 Student (點擊兩下可命名),如下圖:
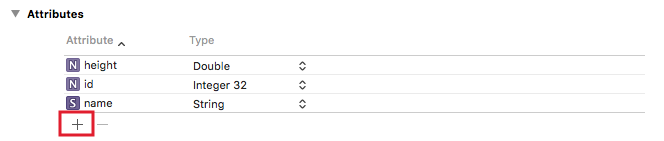
增加完 Entity 後,接著點擊 Attributes 的加號按鈕,依序增加三個 Attribute ,分別為 id, name, height , Type 也就是每一個 Attribute 的類型,依序設定為 Integer 32, String, Double ,如下圖:
這樣就完成了加入 Core Data 的步驟。
使用 Core Data
在稍前建立專案時如果有打勾 Use Core Data,建立完成後會在AppDelegate.swift中為你自動生成相關的程式碼。
一開始先在 ViewController.swift 中引入 CoreData 函式庫:
import CoreData
接著進入到程式碼的部份,在 ViewController.swift 的viewDidLoad()中,宣告一個用來操作 Core Data 的常數:
// 用來操作 Core Data 的常數
let myContext =
    (UIApplication.shared.delegate as! AppDelegate)
    .persistentContainer.viewContext
接著宣告 Entity 的名稱(記得要與前一小節設定的名稱一樣),以供後續使用:
let myEntityName = "Student"
新增資料
新增資料的方式如下:
// insert
let insetData = NSEntityDescription.insertNewObject(
    forEntityName: myEntityName, into: myContext)

insetData.setValue(1, forKey: "id")
insetData.setValue("Jesse", forKey: "name")
insetData.setValue(176.2, forKey: "height")

do {
    try myContext.save()
} catch {
    fatalError("\(error)")
}
上述程式經由NSEntityDescription類別的insertNewObject(forEntityName:into:)方法來新增一筆資訊,這個方法的兩個參數分別為 Entity 名稱及一開始宣告的用來操作 Core Data 的常數。
接著回傳的常數insetData,可以使用方法setValue(_:forKey:)將要新增的資料一一填入,這個方法的第一個參數為要新增的值,第二個參數則是 Entity 的 Attribute 。這時的進度就與稍前文件夾例子中的 2. 拿出一張新的紙相同(將一位新學生的基本資料填上)。
目前已經有一筆新資料了,但尚未將這筆資料儲存,所以接著要使用常數myContext的save()方法來儲存資料,而因為這個方法是一個拋出函式,所以使用do-catch語句來定義錯誤的捕獲。
如果沒有發生錯誤,即是順利儲存一筆新的資料。
讀取資料
讀取資料的方式如下:
// retrieve
let request = NSFetchRequest<NSFetchRequestResult>(
    entityName: myEntityName)

do {
    let results =
        try myContext.fetch(request) as! [NSManagedObject]

    for result in results {
        print("\(result.value(forKey: "id")!). \(result.value(forKey: "name")!)")
        print("身高: \(result.value(forKey: "height")!)")
    }

} catch {
    fatalError("\(error)")
}
要取得資料首先必須使用類別NSFetchRequest來設置要取得的 Entity ,以用來建立一個取得資料的請求( request )。
再將這個 request 當做myContext的方法fetch(_:)的參數來取得資料。順利取回的資料會是一個型別為[NSManagedObject]的陣列,便可以使用for-in迴圈來依序取得每筆資料。
更新資料
更新資料的方式如下:
// update
let request =
    NSFetchRequest<NSFetchRequestResult>(
        entityName: myEntityName)

request.predicate = nil
let updateID = 1
request.predicate =
  NSPredicate(format: "id = \(updateID)")

do {
    let results =
        try myContext.fetch(request) as! [NSManagedObject]

    if results.count > 0 {
        results[0].setValue( 156.5, forKey: "height")
        try myContext.save()
    }

} catch {
    fatalError("\(error)")
}
更新資料前需要先讀取資料,所以一開始與稍前的程式碼類似,同樣使用類別NSFetchRequest來設置要取得的 Entity ,以建立一個取得資料的請求( request )。
這邊介紹了NSFetchRequest的一個屬性predicate,這可以讓你設定取得資料的條件,例如這個例子設定條件為NSPredicate(format: "id = 1"):取得id = 1的資料。(與關聯式資料庫的 where 條件類似。)
接著與稍前例子一樣,使用fetch(_:)來取得資料,而這個例子因為是要更新資料,所以在順利取得後,將要更新的屬性設置完畢,再以save()來儲存這個更新的動作。
Hint
- 這個例子中的
request.predicate = nil不是必須的,是用來提醒你,如果有多個查詢資料庫的需求,在每次新的查詢要設定屬性predicate前,要先將其設置為nil以清空查詢條件。 - 如果查詢條件的類型為 text ,記得參數
format中要將該值以單引號'包含起來,像是NSPredicate(format: "name = '小強'")這樣。
刪除資料
刪除資料方式如下:
// delete
let request =
    NSFetchRequest<NSFetchRequestResult>(
        entityName: myEntityName)
request.predicate = nil
let deleteID = 3
request.predicate =
  NSPredicate(format: "id = \(deleteID)")

do {
    let results =
        try myContext.fetch(request) as! [NSManagedObject]

    for result in results {
        myContext.delete(result)
    }
    try myContext.save()

} catch {
    fatalError("\(error)")
}
刪除資料與更新資料的方式類似,所以請參考稍前的例子,主要注意到delete(_:)這個方法是用來刪除資料,而最後仍然要記得使用save()來儲存這個刪除的動作。
以上便為基本操作 Core Data 的方式。
將 Core Data 功能獨立出來
這一小節會將 Core Data 功能獨立寫在一個類別中,來把實際操作 Core Data 的程式碼封裝起來,這樣一般在使用時就不會使用到 Core Data 相關的類別或函式。
首先以新增檔案的方式加入一個.swift檔案,命名為CoreDataConnect.swift,記得檔案類型要選擇Swift File:
iOS > Source > Swift File
接著打開這隻檔案,先建立一個類別及其內的屬性跟建構器:(記得要先import CoreData)
class CoreDataConnect {
    var myContext :NSManagedObjectContext! = nil

    init(context:NSManagedObjectContext) {
        self.myContext = context
    }

}
新增資料
首先在上面這個類別中,定義新增資料的方法:
// insert
func insert(
    _ myEntityName:String,
    attributeInfo:[String:String]) -> Bool {

    let insetData =
        NSEntityDescription.insertNewObject(
            forEntityName: myEntityName,
            into: myContext)

    for (key,value) in attributeInfo {
        let t = insetData.entity.attributesByName[key]?.attributeType

        if t == .integer16AttributeType
            || t == .integer32AttributeType
            || t == .integer64AttributeType {
            insetData.setValue(Int(value), forKey: key)
        } else if t == .doubleAttributeType
            || t == .floatAttributeType {
            insetData.setValue(Double(value), forKey: key)
        } else if t == .booleanAttributeType {
            insetData.setValue((value == "true" ? true : false), forKey: key)
        } else {
            insetData.setValue(value, forKey: key)
        }
    }

    do {
        try myContext.save()

        return true
    } catch {
        fatalError("\(error)")
    }

}
這個方法與稍前介紹新增資料時的程式碼一樣,有一點要注意的是,這邊因為其中一個傳入的參數:要新增的 attribute 及其值,是統一以字串傳入,所以這個方法內需要根據 attribute 的類型insetData.entity.attributesByName[key]?.attributeType來轉換型別為 Int, Double, Bool 或是原本的字串,再以方法
setValue(_:forKey:)設置值並儲存。
讀取資料
接著定義讀取資料的方法:
// retrieve
func retrieve(
    _ myEntityName:String,
    predicate:String?,
    sort:[[String:Bool]]?,
    limit:Int?) -> [NSManagedObject]? {
    let request =
        NSFetchRequest<NSFetchRequestResult>(
            entityName: myEntityName)

    // predicate
    if let myPredicate = predicate {
        request.predicate = NSPredicate(format: myPredicate)
    }

    // sort
    if let mySort = sort {
        var sortArr :[NSSortDescriptor] = []
        for sortCond in mySort {
            for (k, v) in sortCond {
                sortArr.append(
                    NSSortDescriptor(key: k, ascending: v))
            }
        }

        request.sortDescriptors = sortArr
    }

    // limit
    if let limitNumber = limit {
        request.fetchLimit = limitNumber
    }


    do {
        return try myContext.fetch(request) as? [NSManagedObject]

    } catch {
        fatalError("\(error)")
    }

}
讀取資料的方法加入了三個額外查詢功能:查詢條件predicate與排序方式sortDescriptors以及限制查詢筆數fetchLimit,並將其都設為可選型別,這樣如果不需要時填入nil即可,返回的是一個型別為[NSManagedObject]的陣列。
更新資料
定義更新資料的方法:
// update
func update(
    _ myEntityName:String,
    predicate:String?,
    attributeInfo:[String:String]) -> Bool {
    if let results = self.retrieve(
        myEntityName, predicate: predicate, sort: nil, limit: nil) {
        for result in results {
            for (key,value) in attributeInfo {
                let t = result.entity.attributesByName[key]?.attributeType

                if t == .integer16AttributeType
                    || t == .integer32AttributeType
                    || t == .integer64AttributeType {
                    result.setValue(Int(value), forKey: key)
                } else if t == .doubleAttributeType
                    || t == .floatAttributeType {
                    result.setValue(Double(value), forKey: key)
                } else if t == .booleanAttributeType {
                    result.setValue((value == "true" ? true : false), forKey: key)
                } else {
                    result.setValue(value, forKey: key)
                }
            }
        }

        do {
            try myContext.save()

            return true
        } catch {
            fatalError("\(error)")
        }
    }

    return false
}
這邊會先以讀取資料方法,取得要更新的資料,再將各 attribute 設置好後才再儲存,與新增資料相同,統一以字串傳入,所以需要根據 attribute 類型來轉換型別。
刪除資料
定義刪除資料的方法:
// delete
func delete(
    _ myEntityName:String, predicate:String?) -> Bool {
    if let results = self.retrieve(
        myEntityName, predicate: predicate, sort: nil, limit: nil) {
        for result in results {
            myContext.delete(result)
        }

        do {
            try myContext.save()

            return true
        } catch {
            fatalError("\(error)")
        }
    }

    return false
}
這邊會先以讀取資料方法,取得要刪除的資料,再將取得的資料刪除,並儲存刪除的動作。
使用這個類別
將 Core Data 功能寫在一個類別後,接著將 ViewController.swift 的viewDidLoad()內容改寫為:
let myEntityName = "Student"
let myContext =
    (UIApplication.shared.delegate as! AppDelegate)
    .persistentContainer.viewContext
let coreDataConnect = CoreDataConnect(context: myContext)

// auto increment
let myUserDefaults = UserDefaults.standard
var seq = 1
if let idSeq = myUserDefaults.object(forKey: "idSeq") as? Int {
    seq = idSeq + 1
}

// insert
let insertResult = coreDataConnect.insert(
    myEntityName, attributeInfo: [
        "id" : "\(seq)",
        "name" : "小強\(seq)",
        "height" : "\(176.5 + Double(seq))"
    ])
if insertResult {
    print("新增資料成功")

    myUserDefaults.set(seq, forKey: "idSeq")
    myUserDefaults.synchronize()
}

// select
let selectResult = coreDataConnect.retrieve(
    myEntityName, predicate: nil, sort: [["id":true]], limit: nil)
if let results = selectResult {
    for result in results {
        print("\(result.value(forKey: "id")!). \(result.value(forKey: "name")!)")
        print("身高: \(result.value(forKey: "height")!)")
    }
}

// update
let updateId = seq - 1
var predicate = "id = \(updateId)"
let updateResult = coreDataConnect.update(
    myEntityName,
    predicate: predicate,
    attributeInfo: ["height":"\(seq * 10)"])
if updateResult {
    print("更新資料成功")
}

// delete
let deleteID = seq - 2
predicate = "id = \(deleteID)"
let deleteResult = coreDataConnect.delete(
    myEntityName, predicate: predicate)
if deleteResult {
    print("刪除資料成功")
}
上述程式可以發現已經看不到操作 Core Data 相關的類別與函式,因為已經都寫在 CoreDataConnect.swift 中了。
其中要提醒的是,因為 Core Data 沒有提供 auto increment 的功能(每次新增資料都自動為其中一個 attribute 遞增的功能),所以這邊以UserDefaults儲存一個數值來手動建立 auto increment 功能,每次新增資料成功時都將這個值加一,下次新增時會再取出這個值來使用。
以上便為本節範例的內容。
範例
本節範例程式碼放在 database/coredata