表格 UITableView
UITableView 是一個很常見的元件,當你需要將一批資料逐列顯示時常會使用到,每一個儲存格稱作一個 cell ,每個 cell 除了可以顯示文字外,還可以放置多個不同的元件。本節的目標如下:
首先在 Xcode 裡,新建一個 Single View Application 類型的專案,取名為 ExUITableView 。
一開始先為ViewController建立一個測試用的陣列屬性:
class ViewController: UIViewController {
    var info = [
        ["林書豪","陳信安"],
        ["陳偉殷","王建民","陳金鋒","林智勝"]
    ]

    // 省略
}
建立 UITableView
先在viewDidLoad()中建立 UITableView :
// 建立 UITableView 並設置原點及尺寸
let myTableView = UITableView(frame: CGRect(
  x: 0, y: 20,
  width: fullScreenSize.width,
  height: fullScreenSize.height - 20),
  style: .grouped)

// 註冊 cell
myTableView.register(
    UITableViewCell.self, forCellReuseIdentifier: "Cell")

// 設置委任對象
myTableView.delegate = self
myTableView.dataSource = self

// 分隔線的樣式
myTableView.separatorStyle = .singleLine

// 分隔線的間距 四個數值分別代表 上、左、下、右 的間距
myTableView.separatorInset =
  UIEdgeInsets.init(
    top: 0, left: 20, bottom: 0, right: 20)

// 是否可以點選 cell
myTableView.allowsSelection = true

// 是否可以多選 cell
myTableView.allowsMultipleSelection = false

// 加入到畫面中
self.view.addSubview(myTableView)
UITableView 可以設置為兩種樣式,如下圖,左邊為.plain及右邊的.grouped:
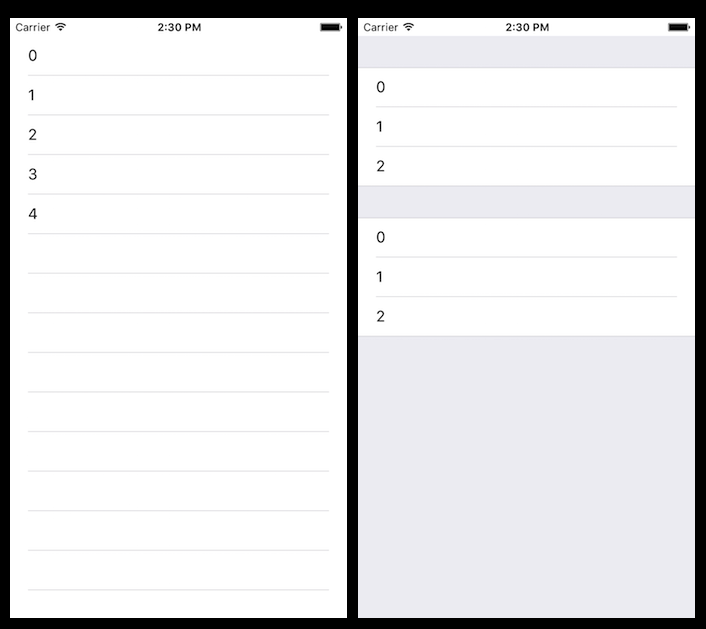
可依照需求設置不同的樣式,本節範例會以.grouped作為示範。
接著看到register(_: forCellReuseIdentifier:)這個註冊 cell 的方法。要先了解到當 cell 數量超過一個畫面可顯示時,目前存在的 cell 只有畫面上的這些(否則資料有成千上萬時,誰受得了),當上下滑動時,會隨顯示畫面的不同同時移出並加入 cell,這個動作不是一直建立新的 cell 而是會重複使用( reuse ),所以必須先註冊這個 reuse 的 cell ,辨識名稱設為"Cell",來讓後續顯示時可以使用。
委任模式
UITableView 必須設置委任模式的對象來完善這個表格的內容,先為ViewController加上委任需要的協定:
class ViewController: UIViewController,
  UITableViewDelegate, UITableViewDataSource {
  // 省略
}
以及兩個必須實作的方法:
// 必須實作的方法:每一組有幾個 cell
func tableView(_ tableView: UITableView,
numberOfRowsInSection section: Int) -> Int {
return info[section].count
}
// 必須實作的方法:每個 cell 要顯示的內容
func tableView(_ tableView: UITableView,
cellForRowAt indexPath: IndexPath) -> UITableViewCell {
// 取得 tableView 目前使用的 cell
let cell = tableView.dequeueReusableCell(
withIdentifier: "Cell",
for: indexPath) as UITableViewCell
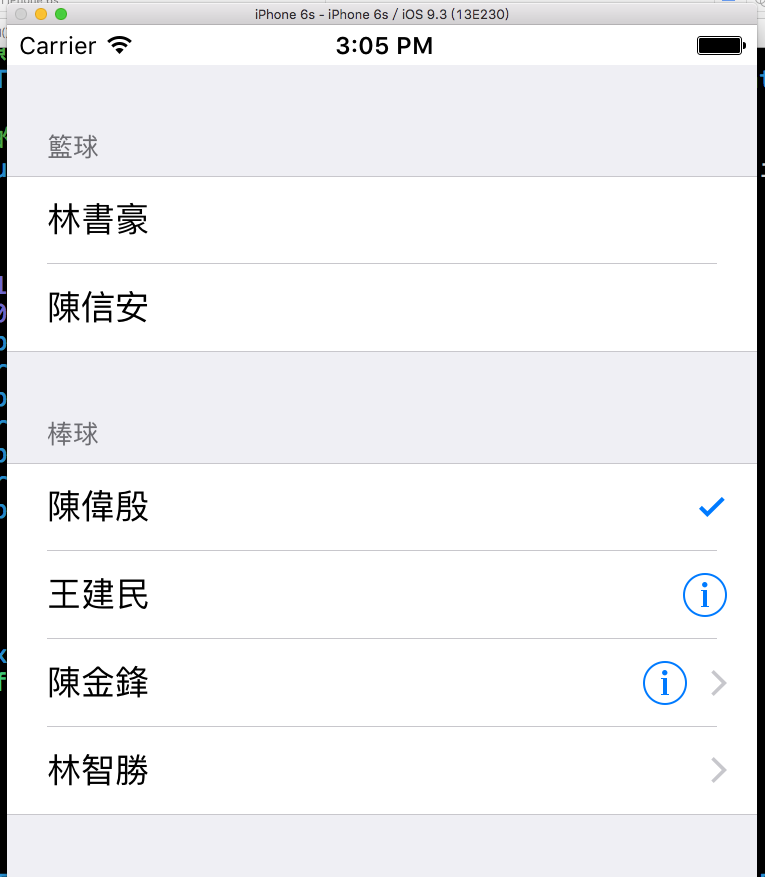
// 設置 Accessory 按鈕樣式
if indexPath.section == 1 {
if indexPath.row == 0 {
cell.accessoryType = .checkmark
} else if indexPath.row == 1 {
cell.accessoryType = .detailButton
} else if indexPath.row == 2 {
cell.accessoryType = .detailDisclosureButton
} else if indexPath.row == 3 {
cell.accessoryType = .disclosureIndicator
}
}
// 顯示的內容
if let myLabel = cell.textLabel {
myLabel.text =
"\(info[indexPath.section][indexPath.row])"
}
return cell
}
UITableView 委任的方法大多會有indexPath參數,這個參數有兩個屬性分別為section及row,是用來表示目前要設置的 cell 是屬於哪一組( section )的哪一列( row ),型別都為 Int 且都是由 0 開始算起。
主要注意到第二個方法每個 cell 要顯示的內容。一開始可以看到需要使用稍前註冊的 cell 使用的辨識名稱"Cell",這邊就是告訴程式要使用哪一個 cell 來重複使用。
接著看到設置 Accessory 按鈕樣式,顯示在每個 cell 右邊的按鈕,可依照需求設置不同的樣式,如果不設置就是留空。
最後可以看到cell.textLabel,型別為UILabel?,分別依照不同組的不同列來設置顯示的文字。
委任對象除了必須實作的方法之外,還有許多可以額外設置的方法,如下:
// 點選 cell 後執行的動作
func tableView(_ tableView: UITableView,
    didSelectRowAt indexPath: IndexPath) {
    // 取消 cell 的選取狀態
    tableView.deselectRow(
        at: indexPath, animated: true)

    let name =
        info[indexPath.section][indexPath.row]
    print("選擇的是 \(name)")
}

// 點選 Accessory 按鈕後執行的動作
// 必須設置 cell 的 accessoryType
func tableView(_ tableView: UITableView,
    accessoryButtonTappedForRowWith indexPath: IndexPath) {
    let name =
        info[indexPath.section][indexPath.row]
    print("按下的是 \(name) 的 detail")
}

// 有幾組 section
func numberOfSections(in tableView: UITableView) -> Int {
    return info.count
}

// 每個 section 的標題
func tableView(_ tableView: UITableView,
    titleForHeaderInSection section: Int) -> String? {
    let title = section == 0 ? "籃球" : "棒球"
    return title
}
以上便為本節範例的內容。
更多委任對象的方法
UITableView 提供給委任對象可以實作的方法很多,除了本節範例中示範的之外,以下再列出常使用到的方法,可依照需求彈性使用:
// 設置每個 section 的 title 為一個 UIView
// 如果實作了這個方法 會蓋過單純設置文字的 section title
func tableView(_ tableView: UITableView,
    viewForHeaderInSection section: Int) -> UIView? {
    return UIView()
}

// 設置 section header 的高度
func tableView(_ tableView: UITableView,
    heightForHeaderInSection section: Int) -> CGFloat {
    return 80
}

// 每個 section 的 footer
func tableView(_ tableView: UITableView,
    titleForFooterInSection section: Int) -> String? {
    return "footer"
}

// 設置每個 section 的 footer 為一個 UIView
// 如果實作了這個方法 會蓋過單純設置文字的 section footer
func tableView(_ tableView: UITableView,
    viewForFooterInSection section: Int) -> UIView? {
    return UIView()
}

// 設置 section footer 的高度
func tableView(_ tableView: UITableView,
    heightForFooterInSection section: Int) -> CGFloat {
    return 80
}

// 設置 cell 的高度
func tableView(_ tableView: UITableView,
    heightForRowAt indexPath: IndexPath) -> CGFloat {
    return 80
}
更多內容請參考 UITableView 的編輯模式。
範例
本節範例程式碼放在 uikit/uitableview