地圖與定位
這一小節會介紹如何將地圖放到畫面中,並加上景點的地點標示,另外還會說明如何開啟定位,讓你可以看到目前在地圖上的自身位置。
因為模擬器的定位功能有時會出現問題,所以這小節的範例建議以實機來執行與測試。
首先在 Xcode 裡,新建一個 Single View Application 類型的專案,取名為 ExMap 。建立好專案後再以加入檔案的方式加入一張定位圖示的圖片。
預設的應用程式沒有地圖及定位功能,所以一開始必須先將這兩個函式庫引入,分別為MapKit及CoreLocation:
import MapKit
import CoreLocation
再來為ViewController建立兩個屬性,以供後續使用,如下:
class ViewController: UIViewController {
    var myLocationManager :CLLocationManager!
    var myMapView :MKMapView!

    // 省略
}
定位 CoreLocation
設置定位功能的步驟簡單介紹如下:
- 建立獲得定位資訊的變數,並設置屬性。
- 設置委任方法以獲得定位資訊。
- 向使用者取得定位權限。
- 設置應用程式需要的定位服務規則。
- 開始與結束更新定位位置。
以下會如步驟所述依序介紹。
首先在viewDidLoad()中使用類別CLLocationManager()增加定位功能,如下:
// 建立一個 CLLocationManager
myLocationManager = CLLocationManager()

// 設置委任對象
myLocationManager.delegate = self

// 距離篩選器 用來設置移動多遠距離才觸發委任方法更新位置
myLocationManager.distanceFilter =
    kCLLocationAccuracyNearestTenMeters

// 取得自身定位位置的精確度
myLocationManager.desiredAccuracy =
    kCLLocationAccuracyBest
上述程式中的distanceFilter與desiredAccuracy這兩個屬性,都與精確度有關,可以設置的值如下:
- kCLLocationAccuracyBestForNavigation:精確度最高,適用於導航的定位。
- kCLLocationAccuracyBest:精確度高。
- kCLLocationAccuracyNearestTenMeters:精確度 10 公尺以內。
- kCLLocationAccuracyHundredMeters:精確度 100 公尺以內。
- kCLLocationAccuracyKilometer:精確度 1 公里以內。
- kCLLocationAccuracyThreeKilometers:精確度 3 公里以內。
或是你想自己設置數值的大小,也可以設置為一個浮點數,單位為公尺。
這邊將定位功能設置好,稍後會在取得定位權限後,再開始定位自身位置。
定位功能可以設置委任對象,接著先介紹委任方法的實作。
委任方法
先為委任對象(也就是ViewController)加上委任模式需要遵循的協定:
class ViewController: UIViewController,
  CLLocationManagerDelegate {
  // 省略
}
以及在ViewController中實作的委任方法:
func locationManager(
    _ manager: CLLocationManager,
    didUpdateLocations locations: [CLLocation]) {
    // 印出目前所在位置座標
    let currentLocation :CLLocation =
      locations[0] as CLLocation
    print("\(currentLocation.coordinate.latitude)")
    print(", \(currentLocation.coordinate.longitude)")

}
依照稍前設置的屬性distanceFilter的距離精確度,會在定位發生變化時執行上述這個方法,其中參數會獲得目前定位的資訊CLLocation,裡面會有像是緯度( latitude )與經度( longitude )的數值資訊。
授權定位權限
要使用定位功能,必須向使用者額外取得定位的權限,這邊將詢問授權的動作寫在ViewController的viewDidAppear(_:)方法中,每次進到這頁面時都會確認權限,以免在多頁面的應用程式中,使用者又再把權限關閉:
override func viewDidAppear(_ animated: Bool) {
    super.viewDidAppear(animated)

    // 首次使用 向使用者詢問定位自身位置權限
    if CLLocationManager.authorizationStatus() == .notDetermined {
        // 取得定位服務授權
        myLocationManager.requestWhenInUseAuthorization()

        // 開始定位自身位置
        myLocationManager.startUpdatingLocation()
    }
        // 使用者已經拒絕定位自身位置權限
    else if CLLocationManager.authorizationStatus() == .denied {
        // 提示可至[設定]中開啟權限
        let alertController = UIAlertController(
            title: "定位權限已關閉",
            message: "如要變更權限,請至 設定 > 隱私權 > 定位服務 開啟",
            preferredStyle: .alert)
        let okAction = UIAlertAction(
            title: "確認", style: .default, handler:nil)
        alertController.addAction(okAction)
        self.present( alertController, animated: true, completion: nil)
    }
        // 使用者已經同意定位自身位置權限
    else if CLLocationManager.authorizationStatus()
        == .authorizedWhenInUse {
        // 開始定位自身位置
        myLocationManager.startUpdatingLocation()
    }
}
上述程式使用CLLocationManager.authorizationStatus()來確認目前的授權狀態為何。
當其等於.notDetermined時,則為首次詢問授權,便使用方法requestWhenInUseAuthorization()來取得授權,畫面上會出現確認框,詢問使用者是否要授權這個應用程式可以使用定位功能。
等於.denied時,則是已詢問過且使用者拒絕提供定位功能,所以這邊會建立一個提示框,提醒使用者如果要使用定位功能,必須至設定中手動打開。
等於.authorizedWhenInUse時,則是已詢問過且使用者同意提供定位功能,所以這邊便以方法startUpdatingLocation()開始定位自身位置。
增加定位服務規則
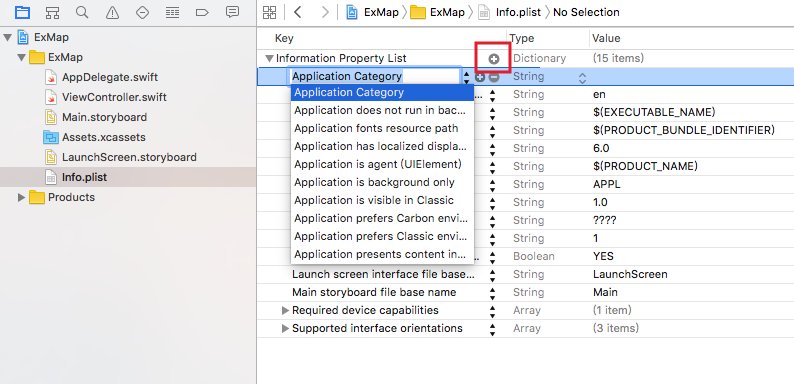
除了需要向使用者詢問權限外,還必須在 Info.plist 檔案中加入一個值,請先打開左側檔案列表中的 Info.plist ,並按下加號按鈕增加,如下:

這個欄位必須填入NSLocationWhenInUseUsageDescription,其餘欄位的 Type 使用預設的 String , Value 則留空,如下:

開始與結束更新定位位置
以上功能都設置好後,就可以開始更新定位位置,也才會開始執行稍前介紹實作的委任方法。
開始更新定位位置的方式已在稍前詢問權限時一同執行了,使用方法startUpdatingLocation()來開始定位位置。
結束更新定位位置則是寫在ViewController的viewDidDisappear(_:)方法中,可以在多頁面應用程式中,離開當前頁面時使用方法stopUpdatingLocation()結束,如下:
override func viewDidDisappear(_ animated: Bool) {
    super.viewDidDisappear(animated)

    // 停止定位自身位置
    myLocationManager.stopUpdatingLocation()
}
你也可以依照需求把結束更新定位位置寫在不同地方,像是如果只要定位一次的話,可以寫在委任方法中。
不同時機的定位功能
實際上可以授權的定位功能依照定位的時機不同有兩種,分別為開啟應用程式時定位WhenInUse及永遠定位Always,前者只在開啟應用程式時,才會使用定位功能,後者則是即使未開啟應用程式,也可以在需要的時候獲得定位資訊。
因為定位功能的耗電量大,所以請依照實際需求向使用者要求權限,上述範例都是使用開啟應用程式時定位WhenInUse的權限,如果要改成永遠定位Always,請注意下述部分:
- 詢問授權的方法從
requestWhenInUseAuthorization()改成requestAlwaysAuthorization()。 - 授權狀態的值從
.authorizedWhenInUse改成.authorizedAlways。 - 定位服務規則填入的值從
NSLocationWhenInUseUsageDescription改成NSLocationAlwaysUsageDescription。
以上便為定位 CoreLocation 的範例介紹,接著會介紹如何使用地圖 MapKit ,同時也會與定位功能結合,讓你可以得知目前所在位置。
地圖 MapKit
設置地圖功能的步驟簡單介紹如下:
- 建立地圖視圖,並設置屬性。
- 加入地點圖示。
- 設置委任方法並自定義大頭針樣式。
以下會如步驟所述依序介紹。
首先在viewDidLoad()中使用類別MKMapView()建立一個地圖視圖,如下:
// 取得螢幕的尺寸
let fullSize = UIScreen.main.bounds.size

// 建立一個 MKMapView
myMapView = MKMapView(frame: CGRect(
  x: 0, y: 20,
  width: fullSize.width,
  height: fullSize.height - 20))

// 設置委任對象
myMapView.delegate = self

// 地圖樣式
myMapView.mapType = .standard

// 顯示自身定位位置
myMapView.showsUserLocation = true

// 允許縮放地圖
myMapView.isZoomEnabled = true

// 地圖預設顯示的範圍大小 (數字越小越精確)
let latDelta = 0.05
let longDelta = 0.05
let currentLocationSpan:MKCoordinateSpan =
  MKCoordinateSpan.init(
    latitudeDelta: latDelta, longitudeDelta: longDelta)

// 設置地圖顯示的範圍與中心點座標
let center:CLLocation = CLLocation(
  latitude: 25.05, longitude: 121.515)
let currentRegion = MKCoordinateRegion(
    center: center.coordinate,
    span: currentLocationSpan)
myMapView.setRegion(currentRegion, animated: true)

// 加入到畫面中
self.view.addSubview(myMapView)
上述程式可以看到,地圖可以設置屬性mapType地圖樣式,除了標準模式.standard,還可設置衛星模式.satellite與混和模式.hybrid等等。
屬性showsUserLocation則是可以在地圖上顯示定位,只要在前一個範例中的詢問定位權限有允許,這個屬性也設為true時,地圖上就會出現自身定位位置。
接著先以類別MKCoordinateRegion(center:span:)設置中心點及範圍,再使用方法setRegion(_: animated:)來設置地圖顯示的中心點與預設顯示範圍大小。
加入地點圖示
在viewDidLoad()中建立好地圖視圖後,接著會示範加入兩個地點圖示,如下:
// 建立一個地點圖示 (圖示預設為紅色大頭針)
var objectAnnotation = MKPointAnnotation()
objectAnnotation.coordinate = CLLocation(
    latitude: 25.036798, longitude: 121.499962).coordinate
objectAnnotation.title = "艋舺公園"
objectAnnotation.subtitle =
    "艋舺公園位於龍山寺旁邊,原名為「萬華十二號公園」。"
myMapView.addAnnotation(objectAnnotation)

// 建立另一個地點圖示 (經由委任方法設置圖示)
objectAnnotation = MKPointAnnotation()
objectAnnotation.coordinate = CLLocation(
    latitude: 25.063059, longitude: 121.533838).coordinate
objectAnnotation.title = "行天宮"
objectAnnotation.subtitle = "行天宮是北臺灣參訪香客最多的廟宇。"
myMapView.addAnnotation(objectAnnotation)
使用類別MKPointAnnotation()來新增一個地點圖示,並設置地點的座標(緯度與經度)及資訊,再以方法addAnnotation(_:)來加入到地圖中。
地點的預設圖示為紅色大頭針,如果要自定義大頭針顏色或是設置成另一個圖片,需要交由委任方法,所以接著會介紹委任方法的實作。
委任方法
先為委任對象(也就是ViewController)加上委任模式需要遵循的協定:(此處包含前一個範例使用的CLLocationManagerDelegate委任協定。)
class ViewController: UIViewController,
  CLLocationManagerDelegate, MKMapViewDelegate {
  // 省略
}
以及在ViewController中實作的委任方法:
//自定義大頭針樣式
func mapView(
    _ mapView: MKMapView,
    viewFor annotation: MKAnnotation)
    -> MKAnnotationView? {
    if annotation is MKUserLocation {
        // 建立可重複使用的 MKAnnotationView
        let reuseId = "MyPin"
        var pinView =
            mapView.dequeueReusableAnnotationView(
                withIdentifier: reuseId)
        if pinView == nil {
            // 建立一個地圖圖示視圖
            pinView = MKAnnotationView(
                annotation: annotation, reuseIdentifier: reuseId)
            // 設置點擊地圖圖示後額外的視圖
            pinView?.canShowCallout = false
            // 設置自訂圖示
            pinView?.image = UIImage(named:"user")
        } else {
            pinView?.annotation = annotation
        }

        return pinView
    } else {

        // 其中一個地點使用預設的圖示
        // 這邊比對到座標時就使用預設樣式 不再額外設置
        if annotation.coordinate.latitude == 25.036798
        && annotation.coordinate.longitude == 121.499962 {
            return nil
        }

        // 建立可重複使用的 MKPinAnnotationView
        let reuseId = "Pin"
        var pinView =
            mapView.dequeueReusableAnnotationView(
                withIdentifier: reuseId) as? MKPinAnnotationView
        if pinView == nil {
            // 建立一個大頭針視圖
            pinView = MKPinAnnotationView(
                annotation: annotation, reuseIdentifier: reuseId)
            // 設置點擊大頭針後額外的視圖
            pinView?.canShowCallout = true
            // 會以落下釘在地圖上的方式出現
            pinView?.animatesDrop = true
            // 大頭針的顏色
            pinView?.pinTintColor = UIColor.blue
            // 這邊將額外視圖的右邊視圖設為一個按鈕
            pinView?.rightCalloutAccessoryView =
                UIButton(type: .detailDisclosure)
        } else {
            pinView?.annotation = annotation
        }

        return pinView
    }

}
上述程式這個實作的委任方法,是用來定義地圖圖示(大頭針)的樣式與內容,與表格 UITableView 的 cell 類似,地圖上的大頭針圖示,會使用方法dequeueReusableAnnotationView(withIdentifier:)來重複使用視圖。
一開始先判斷這個地圖圖示是否為自身定位位置if annotation is MKUserLocation {},當地圖視圖有設置showsUserLocation為true,且有向使用者取得定位權限,這邊則會自動獲得一個自身定位位置MKUserLocation。
這邊示範將定位位置圖示設置為一個新的圖片,這時如果尚未有可以重複使用的視圖,則必須以類別MKAnnotationView()來建立一個視圖,並設置包含圖片的其餘屬性。(手動加入的地點圖示要自定義圖片也是一樣的方式。)
接著則是設置手動加入的地點圖示,這邊為了示範不同的方式,所以以一個座標的緯度與經度判斷地點,來讓一個地點(艋舺公園)使用預設圖示,另一個地點(行天宮)則是自定義圖示內容。
同樣使用方法dequeueReusableAnnotationView(withIdentifier:)來重複使用視圖。如果尚未有可以重複使用的視圖時,則使用另一個類別MKPinAnnotationView()來建立一個視圖(請注意,與自訂圖片時使用的不同。),並設置其餘屬性。
以上內容就會在地圖上顯示或移除地點圖示時重複使用。
MapKit 函式庫提供可以實作的委任方法還有很多,下面列出常使用的方法,請依照需求再各自實作:
func mapView(
    _ mapView: MKMapView,
    regionWillChangeAnimated animated: Bool) {
    print("地圖縮放或滑動時")
}

func mapViewDidFinishLoadingMap(
    _ mapView: MKMapView) {
    print("載入地圖完成時")
}

func mapView(
    _ mapView: MKMapView,
    annotationView view: MKAnnotationView,
    calloutAccessoryControlTapped control: UIControl) {
    print("點擊大頭針的說明")
}

func mapView(
    _ mapView: MKMapView,
    didSelect view: MKAnnotationView) {
    print("點擊大頭針")
}

func mapView(
    _ mapView: MKMapView,
    didDeselect view: MKAnnotationView) {
    print("取消點擊大頭針")
}
以上即為這小節範例的內容。
圖片來源
範例
本節範例程式碼放在 apps/taipeitravel