搜尋 UISearchController
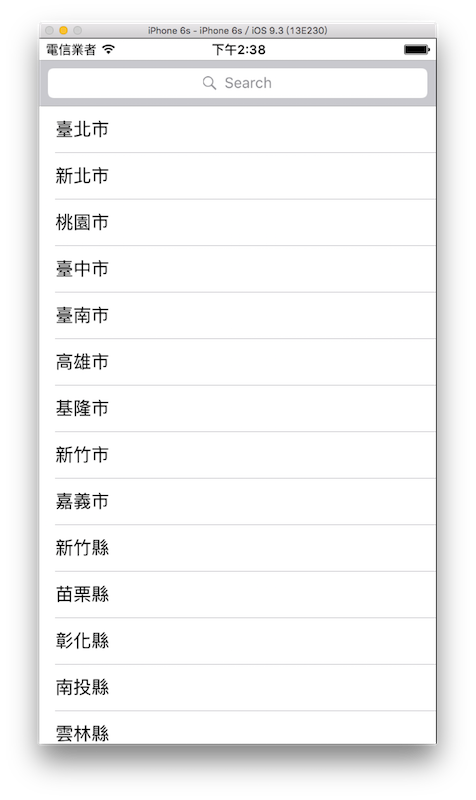
當有一大筆資訊時,通常可以加上搜尋功能,用來篩選出需要的資訊,這節使用 UITableView 配合 UISearchController 來示範一個搜尋框功能,以下是本節目標:

首先在 Xcode 裡,新建一個 Single View Application 類型的專案,取名為 ExUISearchController 。
一開始先為ViewController建立四個屬性:
class ViewController: UIViewController {
    var tableView: UITableView!
    var searchController: UISearchController!

    let cities = [
        "臺北市","新北市","桃園市","臺中市","臺南市",
        "高雄市","基隆市","新竹市","嘉義市","新竹縣",
        "苗栗縣","彰化縣","南投縣","雲林縣","嘉義縣",
        "屏東縣","宜蘭縣","花蓮縣","臺東縣","澎湖縣",]

    var searchArr: [String] = [String](){
        didSet {
            // 重設 searchArr 後重整 tableView
            self.tableView.reloadData()
        }
    }

    // 省略
}
上述設置中,cities是全部原始的資料,而searchArr則是隨搜尋文字不同,篩選出來的資料,didSet的使用方法請參考屬性觀察器。 UITableView 的方法reloadData()則是當資料有更新時重整表格用的。
建立 UISearchController
範例使用 UITableView 來配合搜尋結果,所以要先在viewDidLoad()中建立一個 UITableView :
// 建立 UITableView
tableView = UITableView(frame: CGRect(
    x: 0, y: 20,
    width: fullScreenSize.width,
    height: fullScreenSize.height - 20),
    style: .plain)
tableView.register(
    UITableViewCell.self,
    forCellReuseIdentifier: "Cell")
tableView.delegate = self
tableView.dataSource = self
self.view.addSubview(tableView)
詳細使用方式請參考表格 UITableView。
接著在viewDidLoad()中建立 UISearchController :
// 建立 UISearchController 並設置搜尋控制器為 nil
searchController =
    UISearchController(searchResultsController: nil)

// 將更新搜尋結果的對象設為 self
searchController.searchResultsUpdater = self

// 搜尋時是否隱藏 NavigationBar
// 這個範例沒有使用 NavigationBar 所以設置什麼沒有影響
searchController.hidesNavigationBarDuringPresentation = false

// 搜尋時是否使用燈箱效果 (會將畫面變暗以集中搜尋焦點)
searchController.dimsBackgroundDuringPresentation = false

// 搜尋框的樣式
searchController.searchBar.searchBarStyle = .prominent

// 設置搜尋框的尺寸為自適應
// 因為會擺在 tableView 的 header
// 所以尺寸會與 tableView 的 header 一樣
searchController.searchBar.sizeToFit()

// 將搜尋框擺在 tableView 的 header
self.tableView.tableHeaderView = searchController.searchBar
委任模式
除了 UITableView 有設置委任對象, UISearchController 也同樣設置了更新搜尋結果的委任對象,在前面章節的範例中已經示範過了在self(也就是 ViewController 本身)以及另外建立一個獨立檔案來實作委任對象的方法。這邊則介紹第三種方式,以擴展來實作委任的方法。
實際上就與在self裡實作一樣,但基於 Swift 擴展 ( extension )的特性,可以對 ViewController 新增一個擴展,來將委任方式寫在獨立的一個擴展中。
擴展的詳細說明請參考前面擴展章節介紹的內容。
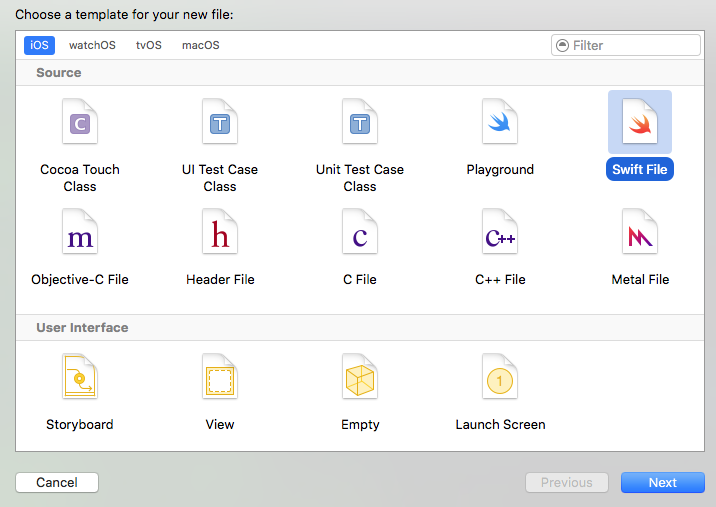
請先以新增檔案的方式新增一個檔案,命名為 ViewControllerExtensions ,不同的地方在於,請選擇iOS > Source > Swift File,如下圖:

建立好檔案後,開啟 ViewControllerExtensions.swift ,先將原本的import Foundation改為import UIKit,並在其中以擴展 ViewController 的方式,加上需要實作的委任方法,如下:
extension ViewController: UITableViewDataSource {
    func tableView(
        _ tableView: UITableView,
        numberOfRowsInSection section: Int) -> Int {
        if (searchController.isActive) {
            return searchArr.count
        } else {
            return cities.count
        }
    }

    func tableView(
        _ tableView: UITableView,
        cellForRowAt indexPath: IndexPath)
        -> UITableViewCell {
        let cell = tableView.dequeueReusableCell(
            withIdentifier: "Cell",
            for: indexPath)

        if (searchController.isActive) {
            cell.textLabel?.text = searchArr[indexPath.row]
            return cell
        } else {
            cell.textLabel?.text = cities[indexPath.row]
            return cell
        }
    }
}

extension ViewController: UITableViewDelegate {
    func tableView(
        _ tableView: UITableView,
        didSelectRowAt indexPath: IndexPath) {
        tableView.deselectRow(at: indexPath, animated: true)
        if (searchController.isActive) {
            print("你選擇的是 \(searchArr[indexPath.row])")
        } else {
            print("你選擇的是 \(cities[indexPath.row])")
        }
    }
}

extension ViewController: UISearchResultsUpdating {
    func updateSearchResults(
        for searchController: UISearchController) {
        // 取得搜尋文字
        guard let searchText = searchController.searchBar.text else {
            return
        }

        searchArr = cities.filter { (city) -> Bool in
            return city.contains(searchText)
        }
    }
}
上述程式中,前兩個擴展用來實作 UITableView 委任的方法,需要注意的是 UISearchController 有一個屬性isActive,用來表示目前是否為搜尋狀態,當搜尋狀態時就是顯示搜尋後的結果searchArr,而非搜尋狀態時則是顯示所有資訊cities。
最後一個擴展則是用來實作更新搜尋結果的方法,首先是取得搜尋的文字,接著則是對原始資料的陣列使用filter()方法篩選資訊。
guard的使用方式請參考提前退出。
以上即為本節範例的內容。
範例
本節範例程式碼放在 uikit/uisearchcontroller