提示框 UIAlertController
在一些情況下,你可能會需要向使用者確認動作是否執行,或是提示一些內容,這時可以使用 UIAlertController 。不過因為這是一個強制將畫面焦點集中於這個提示的動作,所以要確認真的需要才使用,如果過於濫用會帶來不佳的使用者體驗。
本節的目標會建立五個按鈕,按下後會分別示範不同功能的提示框,如下:
首先在 Xcode 裡,新建一個 Single View Application 類型的專案,取名為 ExUIAlert 。
簡單的提示
首先先建立一個簡單的提示,可以用來說明一些簡單的內容,如下:
先建立一個按鈕:
// 設置一個按下會顯示簡單提示的按鈕
var myButton = UIButton(type: .system)
myButton.frame = CGRect(
    x: 0, y: 0, width: 100, height: 30)
myButton.setTitle("簡單提示", for: .normal)
myButton.backgroundColor = UIColor.init(
    red: 0.9, green: 0.9, blue: 0.9, alpha: 1)
myButton.addTarget(
    nil,
    action: #selector(ViewController.simpleHint),
    for: .touchUpInside)
myButton.center = CGPoint(
    x: fullScreenSize.width * 0.5,
    y: fullScreenSize.height * 0.15)
self.view.addSubview(myButton)
接著在ViewController新增一個按下按鈕後要執行動作的方法:
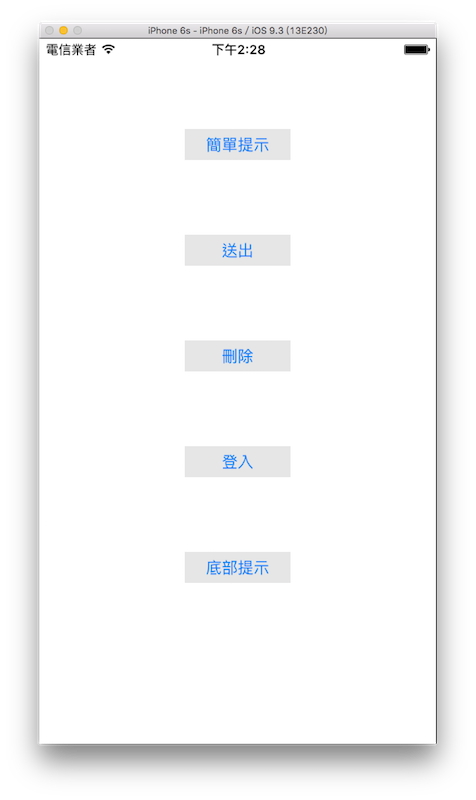
@objc func simpleHint() {
    // 建立一個提示框
    let alertController = UIAlertController(
        title: "提示",
        message: "一個簡單提示,請按確認繼續",
        preferredStyle: .alert)

    // 建立[確認]按鈕
    let okAction = UIAlertAction(
        title: "確認",
        style: .default,
        handler: {
            (action: UIAlertAction!) -> Void in
            print("按下確認後,閉包裡的動作")
    })
    alertController.addAction(okAction)

    // 顯示提示框
    self.present(alertController,
        animated: true, completion: nil)
}
上述程式中,首先看到提示框控制器:UIAlertController(title:, message:, preferredStyle:),是用來建立一個提示框的函式,參數如下:
- title:提示的標題,會以粗體顯示。
- message:提示的內容。
- preferredStyle:提示框的類型,這邊填寫
.alert,會顯示在畫面中間,另外如果填寫.actionSheet則是顯示在畫面底部。
接著可以看到用來建立提示框按鈕的UIAlertAction(title:, style:, handler:),參數如下:
- title:按鈕的文字。
- style:按鈕的樣式,可選擇
.cancel、.default、.destructive等等。 - handler:按下按鈕後要執行的動作,是一個型別為
(action: UIAlertAction!) -> Void的閉包,如果不要有動作則是填入nil。
按鈕設置好之後,再使用alertController.addAction()方法,將按鈕加入到提示框控制器中。
最後則是對self使用present()方法來顯示提示框。
有確認與取消的提示框

先建立一個按鈕:
// 設置一個按下會顯示確認及取消提示的按鈕
myButton = UIButton(type: .system)
myButton.frame = CGRect(
    x: 0, y: 0, width: 100, height: 30)
myButton.setTitle("送出", for: .normal)
myButton.backgroundColor =
    UIColor.init(red: 0.9, green: 0.9, blue: 0.9, alpha: 1)
myButton.addTarget(
    nil,
    action: #selector(ViewController.confirm),
    for: .touchUpInside)
myButton.center = CGPoint(
    x: fullScreenSize.width * 0.5,
    y: fullScreenSize.height * 0.3)
self.view.addSubview(myButton)
接著在ViewController新增一個按下按鈕後要執行動作的方法:
@objc func confirm() {
    // 建立一個提示框
    let alertController = UIAlertController(
        title: "送出",
        message: "確認要送出了嗎?",
        preferredStyle: .alert)

    // 建立[取消]按鈕
    let cancelAction = UIAlertAction(
        title: "取消",
        style: .cancel,
        handler: nil)
    alertController.addAction(cancelAction)

    // 建立[送出]按鈕
    let okAction = UIAlertAction(
        title: "送出",
        style: .default,
        handler: nil)
    alertController.addAction(okAction)

    // 顯示提示框
    self.present(alertController,
        animated: true, completion: nil)
}
Hint
- 按鈕的順序會如同使用
addAction()方法加入的順序。 - 習慣上會將
Cancel按鈕放在左邊。 Cancel按鈕(也就是style設置為.cancel的UIAlertAction())在一個提示框控制器中只能有一個。
警示提示框
先建立一個按鈕:
// 設置一個按下會提示刪除的按鈕
myButton = UIButton(type: .system)
myButton.frame = CGRect(
    x: 0, y: 0, width: 100, height: 30)
myButton.setTitle("刪除", for: .normal)
myButton.backgroundColor =
    UIColor.init(red: 0.9, green: 0.9, blue: 0.9, alpha: 1)
myButton.addTarget(
    nil,
    action: #selector(ViewController.deleteSomething),
    for: .touchUpInside)
myButton.center = CGPoint(
    x: fullScreenSize.width * 0.5,
    y: fullScreenSize.height * 0.45)
self.view.addSubview(myButton)
接著在ViewController新增一個按下按鈕後要執行動作的方法:
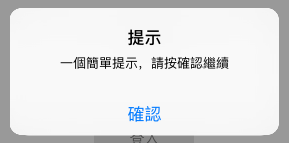
@objc func deleteSomething() {
    // 建立一個提示框
    let alertController = UIAlertController(
        title: "刪除",
        message: "刪除字樣會變紅色的",
        preferredStyle: .alert)

    // 建立[取消]按鈕
    let cancelAction = UIAlertAction(
        title: "取消",
        style: .cancel,
        handler: nil)
    alertController.addAction(cancelAction)

    // 建立[刪除]按鈕
    let okAction = UIAlertAction(
        title: "刪除",
        style: .destructive,
        handler: nil)
    alertController.addAction(okAction)

    // 顯示提示框
    self.present(alertController,
        animated: true, completion: nil)
}
上述程式可以看到建立刪除按鈕的UIAlertAction()的參數style設置為.destructive,這會將按鈕文字改為紅色的,表示這個按鈕選項是警示用的,一般用在可能會改變或刪除資料的動作上。
有輸入框的提示框
先建立一個按鈕:
// 設置一個按下會提示登入的按鈕
myButton = UIButton(type: .system)
myButton.frame = CGRect(
    x: 0, y: 0, width: 100, height: 30)
myButton.setTitle("登入", for: .normal)
myButton.backgroundColor =
    UIColor.init(red: 0.9, green: 0.9, blue: 0.9, alpha: 1)
myButton.addTarget(
    nil,
    action: #selector(ViewController.login),
    for: .touchUpInside)
myButton.center = CGPoint(
    x: fullScreenSize.width * 0.5,
    y: fullScreenSize.height * 0.6)
self.view.addSubview(myButton)
接著在ViewController新增一個按下按鈕後要執行動作的方法:
@objc func login() {
    // 建立一個提示框
    let alertController = UIAlertController(
        title: "登入",
        message: "請輸入帳號與密碼",
        preferredStyle: .alert)

    // 建立兩個輸入框
    alertController.addTextField {
        (textField: UITextField!) -> Void in
            textField.placeholder = "帳號"
    }
    alertController.addTextField {
        (textField: UITextField!) -> Void in
            textField.placeholder = "密碼"

            // 如果要輸入密碼 這個屬性要設定為 true
            textField.isSecureTextEntry = true
    }

    // 建立[取消]按鈕
    let cancelAction = UIAlertAction(
        title: "取消",
        style: .cancel,
        handler: nil)
    alertController.addAction(cancelAction)

    // 建立[登入]按鈕
    let okAction = UIAlertAction(
        title: "登入",
        style: .default) {
        (action: UIAlertAction!) -> Void in
        let acc = (alertController.textFields?.first)! as UITextField
        let password = (alertController.textFields?.last)! as UITextField

        print("輸入的帳號為:\(acc.text!)")
        print("輸入的密碼為:\(password.text!)")
    }
    alertController.addAction(okAction)

    // 顯示提示框
    self.present(alertController, animated: true, completion: nil)
}
要在提示框中加入輸入框,要使用提示框控制器UIAlertController的addTextField()方法加入,參數為一個型別為(textField: UITextField!) -> Void的閉包,可以在這個閉包內為輸入框作額外的設定。
最後在按下登入按鈕函式的閉包中,獲得輸入的帳號與密碼,並使用print()印出來。
Hint
從底部彈出的提示框
先建立一個按鈕:
// 設置一個按下會從底部彈出提示的按鈕
myButton = UIButton(type: .system)
myButton.frame = CGRect(
    x: 0, y: 0, width: 100, height: 30)
myButton.setTitle("底部提示", for: .normal)
myButton.backgroundColor =
    UIColor.init(red: 0.9, green: 0.9, blue: 0.9, alpha: 1)
myButton.addTarget(
    nil,
    action: #selector(ViewController.bottomAlert),
    for: .touchUpInside)
myButton.center = CGPoint(
    x: fullScreenSize.width * 0.5,
    y: fullScreenSize.height * 0.75)
self.view.addSubview(myButton)
接著在ViewController新增一個按下按鈕後要執行動作的方法:
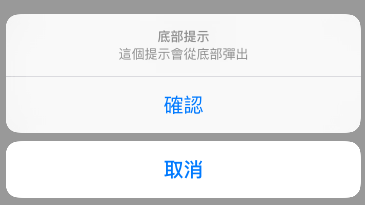
@objc func bottomAlert() {
    // 建立一個提示框
    let alertController = UIAlertController(
        title: "底部提示",
        message: "這個提示會從底部彈出",
        preferredStyle: .actionSheet)

    // 建立[取消]按鈕
    let cancelAction = UIAlertAction(
        title: "取消",
        style: .cancel,
        handler: nil)
    alertController.addAction(cancelAction)

    // 建立[確認]按鈕
    let okAction = UIAlertAction(
        title: "確認",
        style: .default,
        handler: nil)
    alertController.addAction(okAction)

    // 顯示提示框
    self.present(alertController,
        animated: true, completion: nil)
}
上述程式中可以看到UIAlertController()的參數preferredStyle設置為.actionSheet,這便會讓提示框從畫面底部彈出來,要使用哪種方式則是看你自己的需求。
Hint
- 底部提示框不能加入輸入框。
- 如果有加入
Cancel按鈕到底部提示框,它會永遠在最底下一個。
範例
本節範例程式碼放在 uikit/uialert