簡單動畫 Animations
UIKit 提供了一些簡單動畫的功能,這邊說的動畫指的是將視圖( UIView )的屬性以漸進的方式改變,以達成動畫的目的,視圖可供改變的屬性如下:
- frame:視圖的位置與尺寸。
- bounds:視圖的尺寸。
- center:視圖的位置。
- alpha:視圖的透明度。
- backgroundColor:視圖的背景顏色。
- transform:平移、縮放或旋轉視圖。
- contentStretch:拉伸一部分的視圖。
利用這些動畫,可以讓介面變得更為彈性。
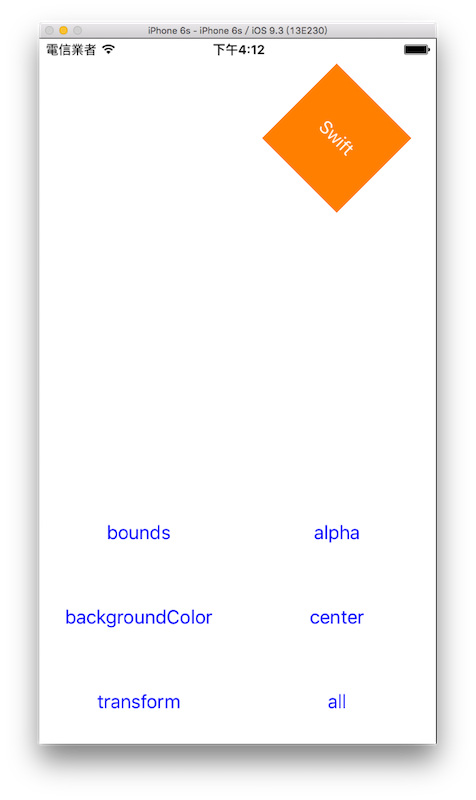
本節範例會示範其中的 bounds 、 center 、 alpha 、 backgroundColor 與 transform ,利用點擊按鈕來執行動畫效果,五個按鈕各別負責上述其中一個動畫功能,以及一個 all 按鈕來執行全部的動畫,如下:
首先在 Xcode 裡,新建一個 Single View Application 類型的專案,取名為 ExAnimations 。
一開始先為ViewController建立屬性與設置預設值,以供後續使用,如下:
class ViewController: UIViewController {
    var myLabel: UILabel!

    let arrBounds = [
        CGSize(width: 100, height: 100),
        CGSize(width: 50, height: 50),
        CGSize(width: 150, height: 150),
        CGSize(width: 50, height: 50)]
    var arrCenter :[CGPoint]!
    let arrAlpha = [0.25, 0.75, 0.5, 1.0]
    let arrBackgroundColor = [
        UIColor.cyan,
        UIColor.green,
        UIColor.orange,
        UIColor.black]
    let arrTransform = [
        CGAffineTransform(rotationAngle: CGFloat(Double.pi * 0.25)),
        CGAffineTransform(rotationAngle: CGFloat(Double.pi * 1.25)),
        CGAffineTransform(rotationAngle: CGFloat(Double.pi * 1.75)),
        CGAffineTransform(rotationAngle: CGFloat(Double.pi * 2))]

    var indexBounds = 0
    var indexCenter = 0
    var indexAlpha = 0
    var indexBackgroundColor = 0
    var indexTransform = 0

    override func viewDidLoad() {
        super.viewDidLoad()

        arrCenter = [
            CGPoint(x: fullSize.width * 0.75, y: fullSize.width * 0.25),
            CGPoint(x: fullSize.width * 0.75, y: fullSize.width * 0.75),
            CGPoint(x: fullSize.width * 0.25, y: fullSize.width * 0.75),
            CGPoint(x: fullSize.width * 0.25, y: fullSize.width * 0.25)]

        // 建立 UIButton 與 UILabel
        self.createButtonsAndLabel()

    }

    // 省略
}
上述程式是用來示範動畫的值,每個動畫都設置四個循環變動的值,像是要變換位置的 center ,就是一個型別為[CGPoint]的陣列,其內依序放置四個位置( CGPoint ),稍後就可以點擊 center 按鈕來切換位置,其他動畫都是類似的方式。
建立 UIButton 與 UILabel 的部份寫在self.createButtonsAndLabel()中,因為與之前範例相似,就省略這個部分,如有需要詳細內容請參考節末的完整範例程式碼。
執行動畫
常用來執行動畫的方法有四種:
UIView.animate(withDuration:, animations:)UIView.animate(withDuration:, animations:, completion:)UIView.animate(withDuration:, delay:, options:, animations:, completion:)UIView.animate(withDuration:, delay:, usingSpringWithDamping:, initialSpringVelocity:, options:, animations:, completion:)
以下會依序利用不同的屬性動畫介紹。
bounds
bounds 可以改變視圖的尺寸,按下 bounds 按鈕後執行動作的方法如下:
@objc func AnimateBounds() {
    let newSize = self.arrBounds[self.indexBounds]
    let originCenter = self.myLabel.center
    UIView.animate(
        withDuration: 0.5,
        animations: {
        self.myLabel.bounds = CGRect(
          x: 0, y: 0,
          width: newSize.width, height: newSize.height)
        self.myLabel.center = originCenter
    })
    self.updateIndex("bounds")
}
上述程式中,先取得目前要變化成為的尺寸newSize,以及目前的位置originCenter,接著用到第一個動畫方法:
UIView.animate(withDuration:, animations:)
有兩個參數:
- 第一個參數為整個動畫執行的時間,單位為秒。
- 第二個參數則是一個閉包( closure ),放置要達成的動畫結果,這邊將尺寸
self.myLabel.bounds設置為前面取得的newSize,動畫的過程便會將視圖在執行時間內,漸進地變大(或變小)尺寸。因為改變尺寸是以原點為準,所以 center 會變,這邊再把 center 設置為原本的值originCenter。
最後使用self.updateIndex()方法來讓示範的值可以循環使用,內容請參考節末的完整範例程式碼,稍後的範例就不再複述。
alpha
alpha 可以改變視圖的透明度,按下 alpha 按鈕後執行動作的方法如下:
@objc func AnimateAlpha() {
    UIView.animate(withDuration: 0.5, animations: {
        self.myLabel.alpha =
          CGFloat(self.arrAlpha[self.indexAlpha])
    }, completion: { _ in
        print("Animation Alpha Complete")
    })

    self.updateIndex("alpha")
}
這邊看到第二個動畫方法:
UIView.animate(withDuration:, animations:, completion:)
與先前的比較多了第三個參數completion,同樣也是個閉包( closure ),在動畫完成後執行,在這裡你可以再接續下一個動畫,或是其他整理、清除的動作。
backgroundColor
backgroundColor 可以改變視圖的背景顏色,按下 backgroundColor 按鈕後執行動作的方法如下:
@objc func AnimateBackgroundColor() {
    UIView.animate(withDuration: 1,
      delay: 0.2,
      options: .curveEaseIn,
      animations: {
        self.myLabel.backgroundColor =
        self.arrBackgroundColor[self.indexBackgroundColor]
      }, completion: { _ in
        print("Animation BackgroundColor Complete")
    })
    self.updateIndex("backgroundColor")
}
這邊看到第三個動畫方法:
UIView.animate(withDuration:, delay:, options:, animations:, completion:)
與先前的比較多了兩個參數,delay是設置為要延遲開始的時間,單位為秒,當你有多個動畫要一起執行時,如果想要有不同時間開始執行的效果可以設置。另一個參數options可以設置如何執行動畫的方式。(依據改變的視圖屬性不同,可能有些會沒有效果。)
center
center 可以改變視圖的位置,按下 center 按鈕後執行動作的方法如下:
@objc func AnimateCenter() {
    UIView.animate(withDuration: 1.5,
      delay: 0.1,
      usingSpringWithDamping: 0.4,
      initialSpringVelocity: 0,
      options: .curveEaseInOut,
      animations: {
        self.myLabel.center =
          self.arrCenter[self.indexCenter]
      }, completion: { _ in
        print("Animation Center Complete")
      })
    self.updateIndex("center")
}
這邊看到第四個動畫方法:
UIView.animate(withDuration:, delay:, usingSpringWithDamping:, initialSpringVelocity:, options:, animations:, completion:)
又較先前的多了兩個參數,這個方法可以讓你的動畫更為生動活潑:
usingSpringWithDamping是設置視圖的回彈量,可設置0 ~ 1,越接近 1 則彈越少下。initialSpringVelocity則是設置初始速度,數字越大則會越快,如果要平滑變化的話可以設置為0。
transform
transform 可以平移、縮放或旋轉視圖,這邊示範旋轉視圖,按下 transform 按鈕後執行動作的方法如下:
@objc func AnimateTransform() {
    UIView.animate(withDuration: 0.5, animations: {
        self.myLabel.transform =
          self.arrTransform[self.indexTransform]
    })
    self.updateIndex("transform")
}
最後則是 all 按鈕,可以一次執行所有的動畫,請參考節末的完整範例程式碼。
以上即為本節範例的內容。
範例
本節範例程式碼放在 uikit/animations