進度條 UIProgressView
當應用程式要執行一個需要花點時間的工作時,通常會使用進度條來告訴使用者,目前正在執行程式中,請稍後。UIKit 提供了兩種可以使用的進度條,一個是長條進度條 UIProgressView 以及環狀進度條 UIActivityIndicatorView 。
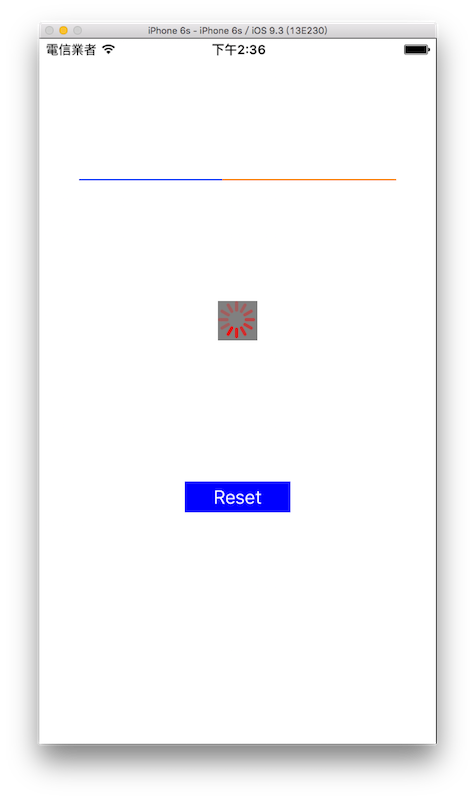
這節會一起示範這兩種進度條,以下是本節目標,分別建立兩種進度條,並放置一個按鈕用來重新執行進度條:
首先在 Xcode 裡,新建一個 Single View Application 類型的專案,取名為 ExUIProgressView 。
一開始先為ViewController建立六個屬性:
class ViewController: UIViewController {
    var myProgressView:UIProgressView!
    var myActivityIndicator:UIActivityIndicatorView!
    var myTimer:Timer?
    var myButton:UIButton!
    var count = 0
    let complete = 100

    // 省略
}
建立 UIProgressView
先在viewDidload裡建立一個長條進度條 UIProgressView ,如下:
// 建立一個 UIProgressView
myProgressView = UIProgressView(
  progressViewStyle : .default)

// UIProgressView 的進度條顏色
myProgressView.progressTintColor = UIColor.blue

// UIProgressView 進度條尚未填滿時底下的顏色
myProgressView.trackTintColor = UIColor.orange

// 設置尺寸與位置並放入畫面中
myProgressView.frame = CGRect(
    x: 0,y: 0,
    width: fullScreenSize.width * 0.8,height: 50)
myProgressView.center = CGPoint(
    x: fullScreenSize.width * 0.5,
    y: fullScreenSize.height * 0.2)
self.view.addSubview(myProgressView)
上述程式中可以看到,使用UIProgressView(progressViewStyle:)建立,有兩種樣式可以選擇,分別為.default及.bar。要讓進度可以推進則是使用到progess屬性,稍後會繼續介紹。
請注意 UIProgressView 只可以設定寬度( width ) ,而高度( height )是固定的。
建立 UIActivityIndicatorView
接著在viewDidload裡建立一個環狀進度條 UIActivityIndicatorView ,如下:
// 建立一個 UIActivityIndicatorView
myActivityIndicator = UIActivityIndicatorView(
  style:.whiteLarge)

// 環狀進度條的顏色
myActivityIndicator.color = UIColor.red

// 底色
myActivityIndicator.backgroundColor =
  UIColor.gray

// 設置位置並放入畫面中
myActivityIndicator.center = CGPoint(
  x: fullScreenSize.width * 0.5,
  y: fullScreenSize.height * 0.4)
self.view.addSubview(myActivityIndicator);
上述程式中可以看到,使用UIActivityIndicatorView(style:)建立,有三種樣式可以選擇,分別為.gray、.white及.whiteLarge。要啟動與停止則是使用到startAnimating()及stopAnimating()方法,稍後會繼續介紹。
請注意 UIActivityIndicatorView 設定的尺寸只會影響底色部分的大小,環狀進度條的尺寸部份則是固定無法變動。
模擬進度推進
在viewDidload裡建立一個按鈕用來重設進度以測試,並在viewDidload的最後先執行一次進度條的動作:
// 建立一個 UIButton
myButton = UIButton(frame: CGRect(
  x: 0, y: 0, width: 100, height: 30))
myButton.setTitle("Reset", for: .normal)
myButton.backgroundColor = UIColor.blue
myButton.addTarget(
  nil,
  action: #selector(ViewController.clickButton),
  for: .touchUpInside)
myButton.center = CGPoint(
  x: fullScreenSize.width * 0.5,
  y: fullScreenSize.height * 0.65)
self.view.addSubview(myButton)

// 先執行一次進度條的動作
self.clickButton()
接著是按下按鈕後執行動作的方法:
@objc func clickButton() {
    // 進度推進時讓按鈕無法作用
    myButton.isEnabled = false

    // 分別重設兩個進度條
    myProgressView.progress = 0
    myActivityIndicator.startAnimating()

    // 建立一個 Timer
    myTimer = Timer.scheduledTimer(
        timeInterval: 0.2,
        target: self,
        selector: #selector(ViewController.showProgress),
        userInfo: ["test":"for userInfo test"],
        repeats: true
    )
}
上述程式可以看到利用 Timer 來設定一個計時器,以模擬進度推進。
Timer 是一個用來定時執行動作的類別,以下介紹scheduledTimer()方法的各參數:
- timeInterval:第一個參數是間隔多久執行一次動作,單位是秒。
- target:執行動作的對象,通常是
self。 - selector:定時執行的方法。
- userInfo:可以把需要的參數帶入方法中,沒有的話就填
nil。 - repeats:是否可以重複執行,如果填
false則是執行一次即不再動作。
在按下按鈕後,就會啟動一個 Timer ,以下則是這個計時器定時執行的方法:
@objc func showProgress(_ sender: Timer) {
    // 以一個計數器模擬背景處理的動作
    count += 5

    // 每次都為進度條增加進度
    myProgressView.progress =
      Float(count) / Float(complete)

    // 進度完成時
    if count >= complete {
        // 示範 userInfo 傳入的參數
        let info =
          sender.userInfo as?
            Dictionary<String, AnyObject>
        print(info?["test"] ?? "")

        // 重設計數器及 Timer 供下次按下按鈕測試
        count = 0
        myTimer?.invalidate()
        myTimer = nil

        // 隱藏環狀進度條
        myActivityIndicator.stopAnimating()

        // 將按鈕功能啟動
        myButton.isEnabled = true
    }
}
上述程式可以看到,使用屬性count每 0.2 秒 +5 ,來模擬進度推進的效果,當count加到 100 時則是完成進度,會重設各設定,以利下次按下按鈕繼續測試。
以上就是本節範例的介紹。請注意,本節範例只是示範用,實際使用進度條的情況應該是,在執行一個需要花點時間的工作時啟動,在這個工作完成時結束。
範例
本節範例程式碼放在 uikit/uiprogressview